Set up 1-1 Virtual Co-Shopping on Shopify
Install the widget, enable your sellers, put the seller app on their iPhone or desktop, and take a real customer call over chat, audio, or video — no code.
Want a 24/7 AI agent or shoppable live shows instead of 1-1 selling? See all setup guides →
Before you start ~25 min · no developer
- Admin access to your Shopify store
- Your brand logo and colors handy
- An iPhone or a desktop computer for each seller
- You'll end with sellers live on chat, audio, and video
Find the Shopify app
In the Shopify App Store, search for Immersive Shopping & Videos.
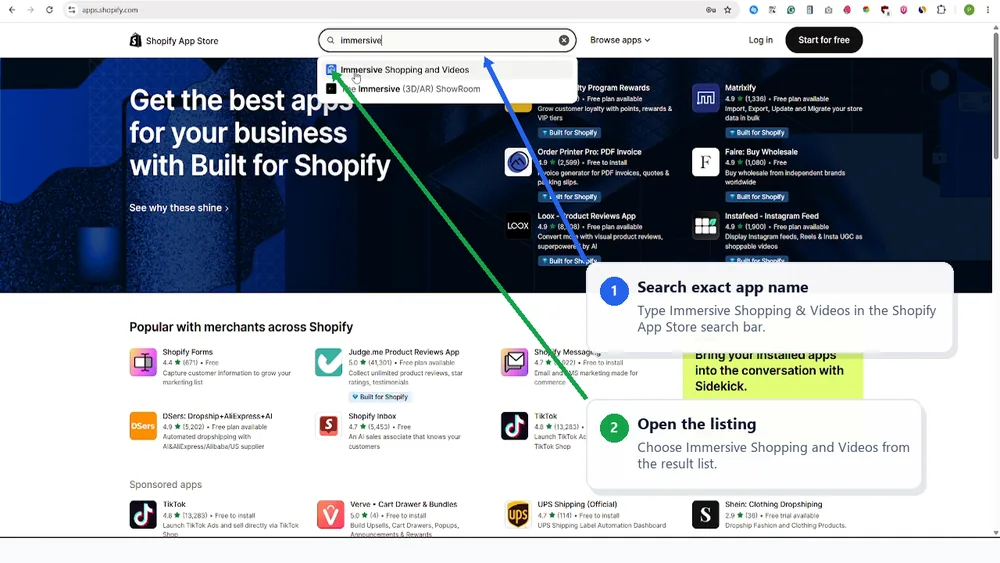
- 1Search the exact name
Type “Immersive Shopping & Videos” in the App Store search bar.
- 2Open the listing
Choose Immersive Shopping and Videos from the results.
Start installation
Click Install and log in with the store account.
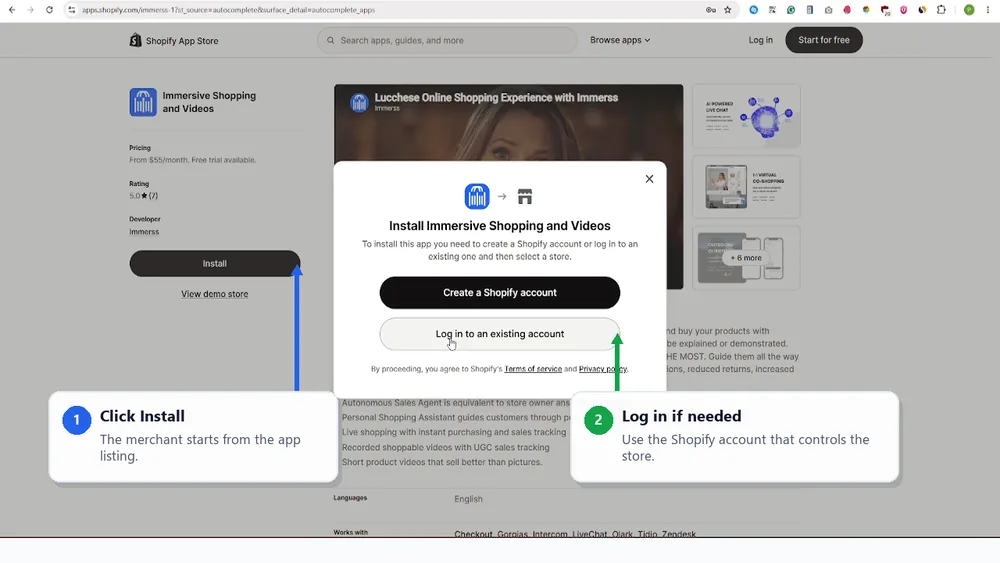
- 1Click Install
The installation starts from the app listing.
- 2Log in if needed
Use the Shopify account that controls the store.
Approve permissions
Review the access scopes and authorize the app.
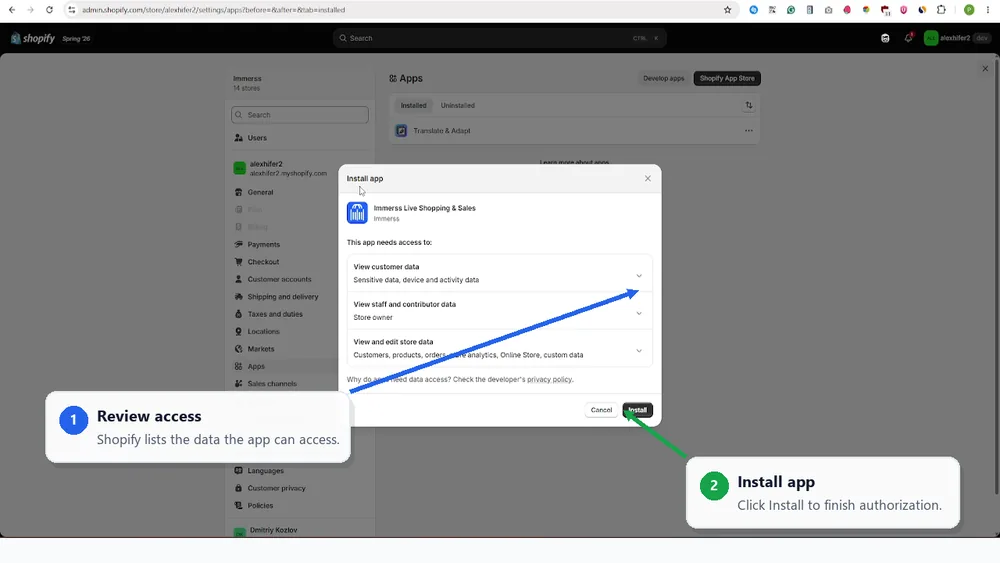
- 1Review access
Shopify lists the data the app can access.
- 2Install app
Click Install to finish authorization.
Connect your Immerss account
Sign in on the left, or register a new Immerss account on the right.
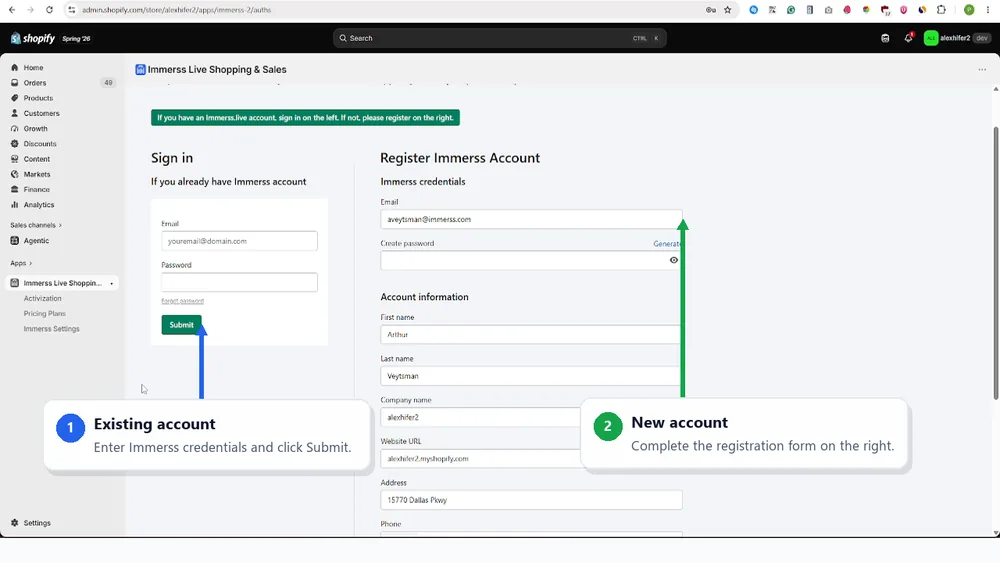
- 1Existing account
Enter Immerss credentials and click Submit.
- 2New account
Complete the registration form on the right.
Activate scripts
In the Shopify app Activation, click Activate for each required storefront script.
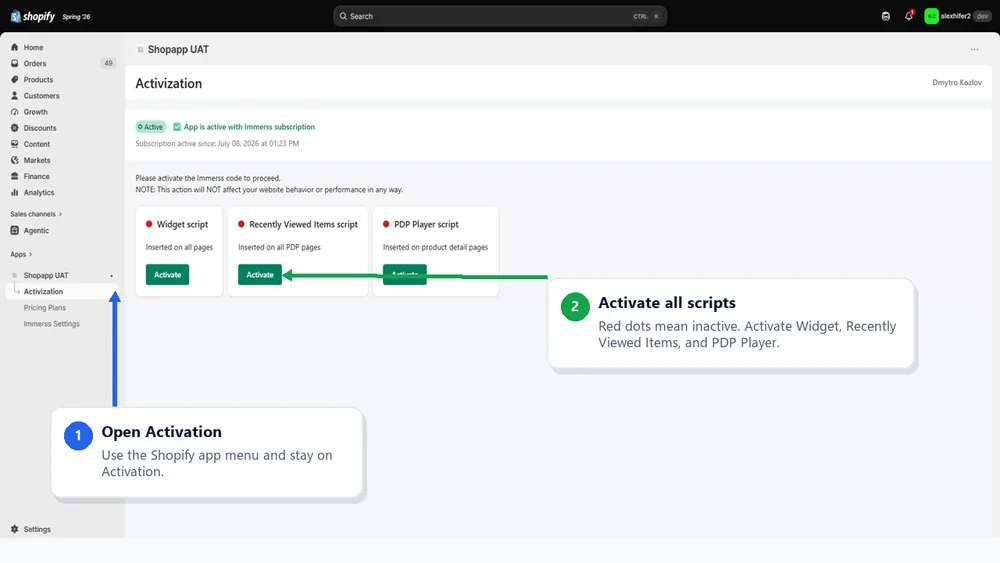
- 1Open Activation
Use the Shopify app menu and go to Activation.
- 2Activate all scripts
Turn on Widget, Recently Viewed Items, and PDP Player — red dots mean inactive.
Enable app embeds
Shopify opens the theme editor for the embedded blocks.
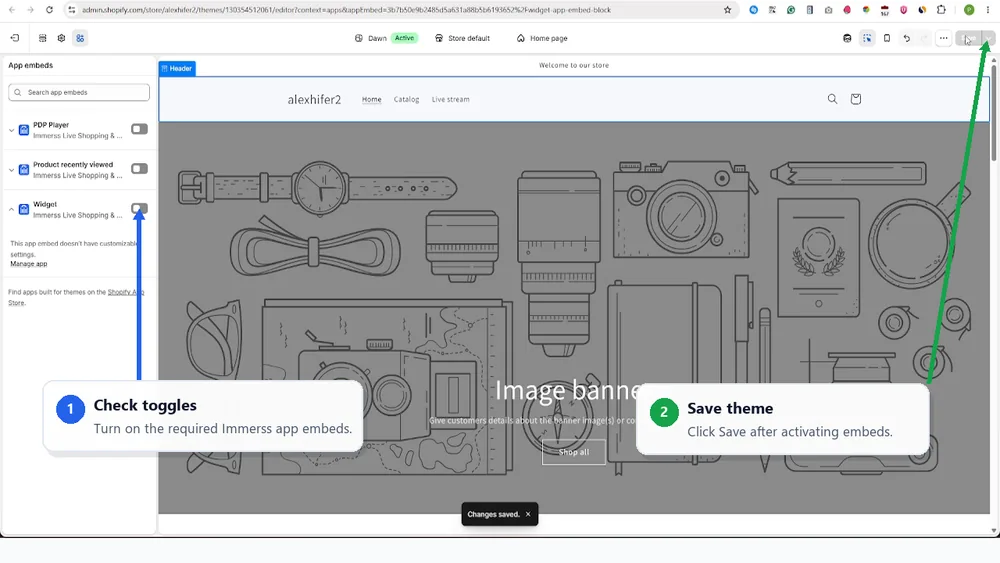
- 1Check the toggle
Turn on the required Immerss app embed.
- 2Save the theme
Click Save after activating the embeds.
Open Pricing Plans
In the Shopify app, open Pricing Plans and click Select Plan.
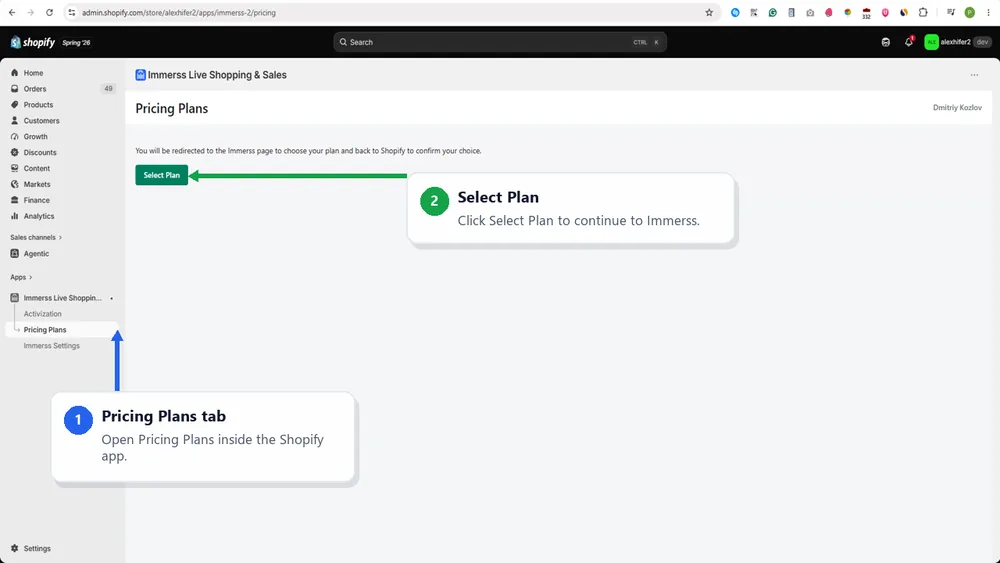
- 1Pricing Plans tab
Open Pricing Plans inside the Shopify app.
- 2Select Plan
Click Select Plan to continue to Immerss.
Choose 1-1 Virtual Co-Shopping
Set the store traffic tier, then select the 1-1 Virtual Co-Shopping plan in Immerss.
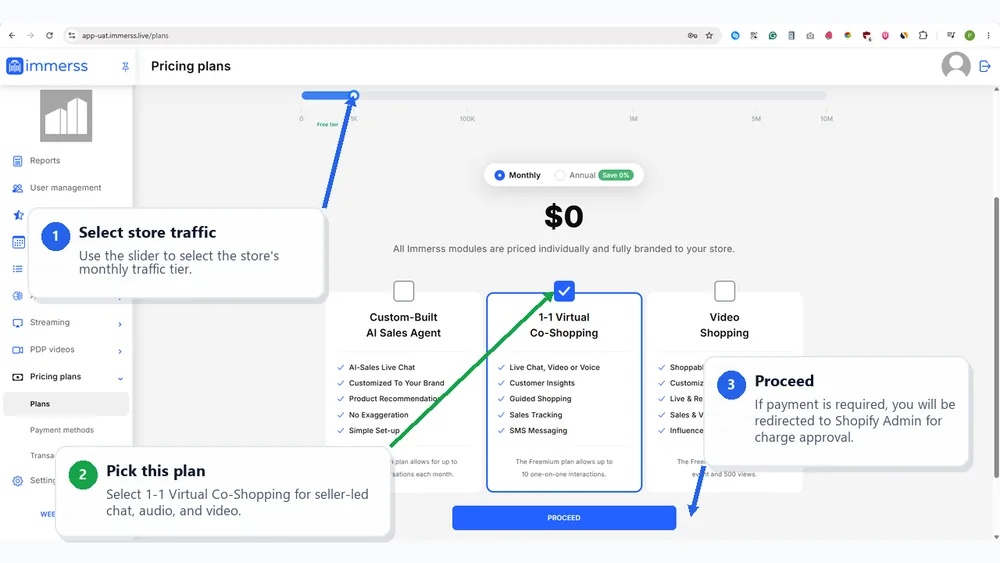
- 1Select store traffic
Use the slider to select the store’s monthly traffic tier.
- 2Pick this plan
Select 1-1 Virtual Co-Shopping for seller-led chat, audio, and video.
- 3Proceed
If payment is required, you’ll be redirected to Shopify Admin for charge approval.
Open Immerss Settings
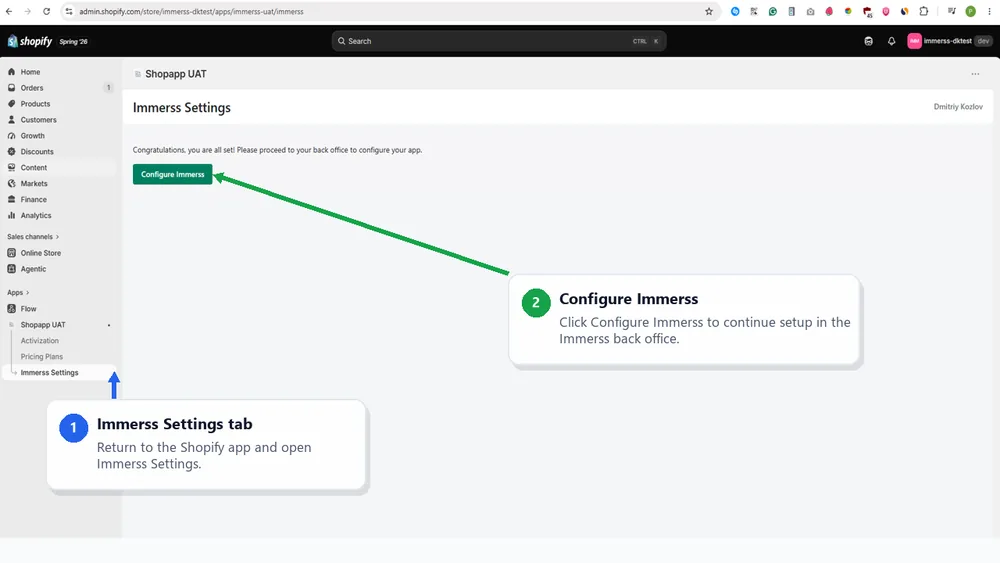
After approving a paid plan in Shopify Admin, open Immerss Settings and click Configure Immerss.
- 1Immerss Settings tab
Return to the Shopify app and open Immerss Settings.
- 2Configure Immerss
Click Configure Immerss to open the Immerss back office.
Branding
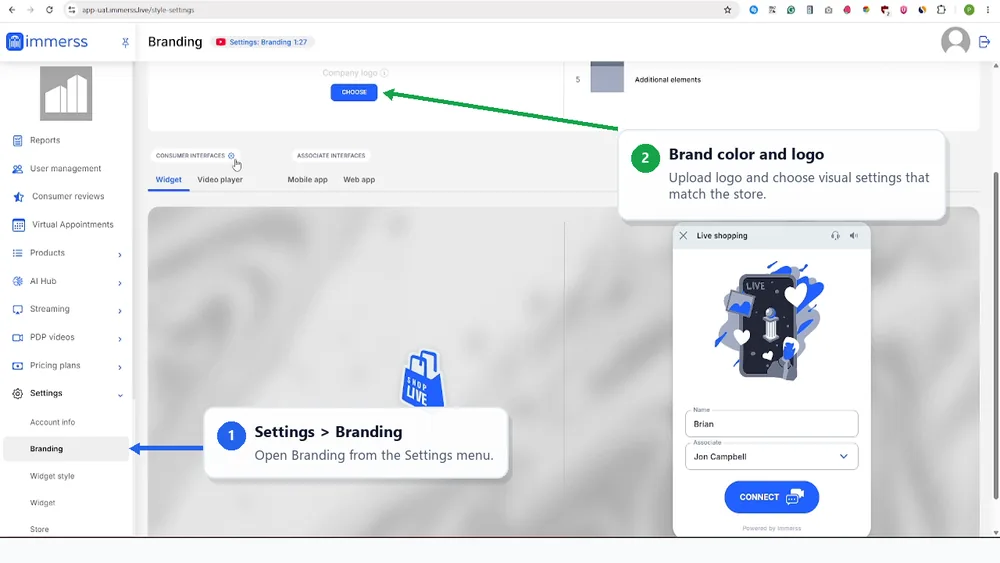
Open Settings > Branding to upload the brand logo and set the brand colors.
- 1Open Branding
Open Branding from the Settings menu.
- 2Brand color and logo
Upload the logo and choose visuals that match the store.
Widget style
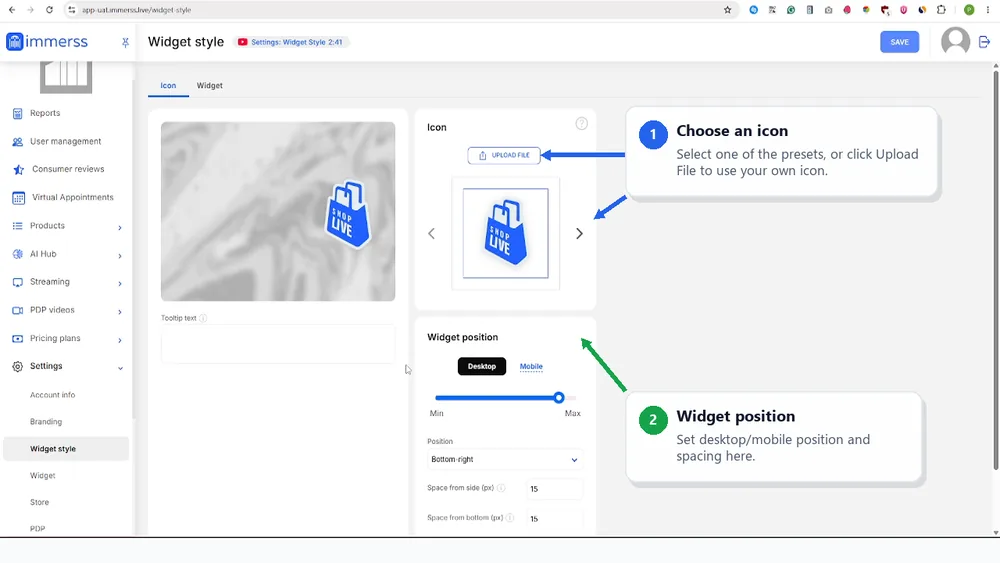
Tune the widget icon, placement, and desktop / mobile behavior.
- 1Choose an icon
Select one of the presets, or click Upload File to use your own icon.
- 2Widget position
Set desktop / mobile position and spacing here.
Widget visibility & schedule
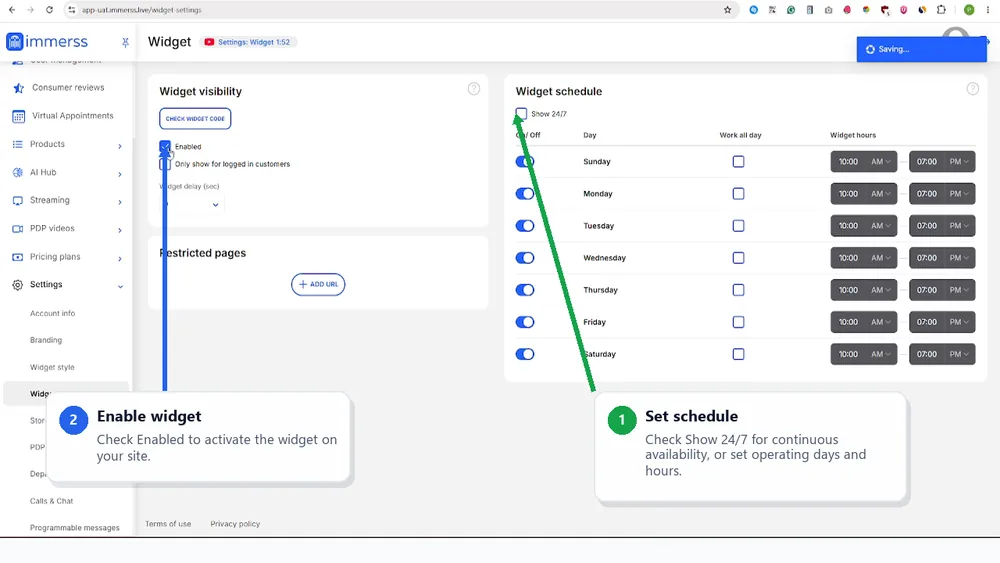
Set the availability schedule, then turn the widget on.
- 1Set schedule
Check Show 24/7 for continuous availability, or set operating days and hours.
- 2Enable widget
Check Enabled to activate the widget on your site.
Enable seller access
In User Management, configure SMS, Clienteling, and the seller’s calling options.
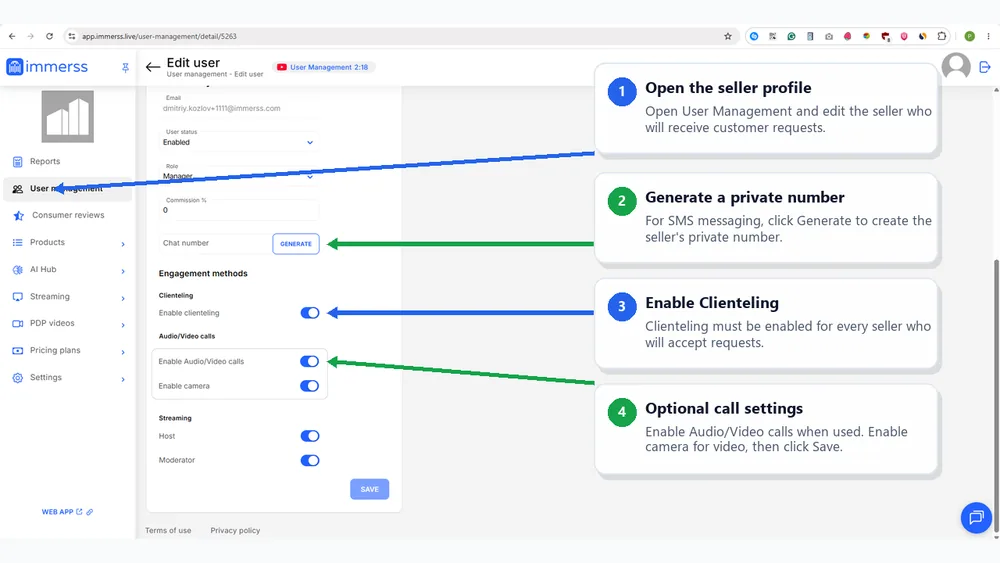
- 1Open the seller profile
Open User Management and edit the seller who will receive customer requests.
- 2Generate a private number
For SMS messaging, click Generate to create the seller’s private number.
- 3Enable Clienteling
Clienteling must be enabled for every seller who will accept requests.
- 4Optional call settings
Enable Audio/Video calls when used. Enable camera for video, then click Save.
Configure Calls & Chat
Open Settings > Calls & Chat to review channels, redirect options, and distribution.
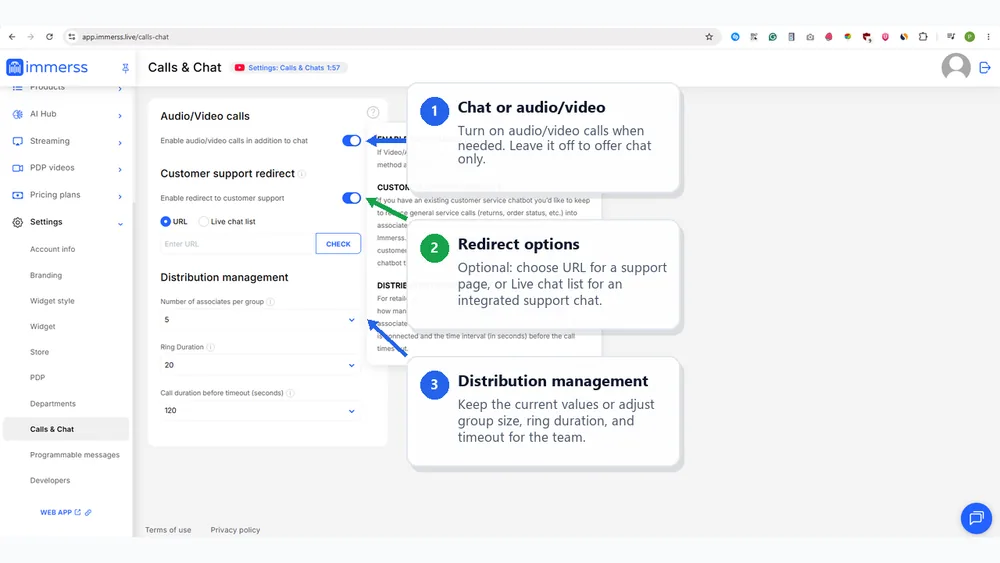
- 1Chat or audio/video
Turn on audio/video calls when needed. Leave it off to offer chat only.
- 2Redirect options
Optional: choose URL for a support page, or Live chat list for an integrated support chat.
- 3Distribution management
Keep the current values or adjust group size, ring duration, and timeout for the team.
Create a canned-message tag
Open Settings > Programmable messages > Canned messages, then create a tag before adding reusable replies.
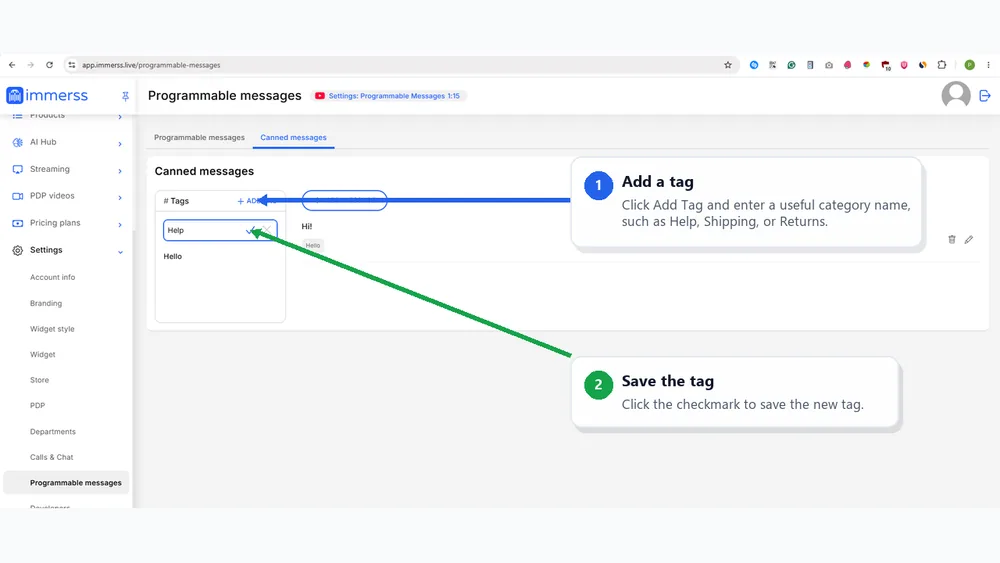
- 1Add a tag
Click Add Tag and enter a useful category name, such as Help, Shipping, or Returns.
- 2Save the tag
Click the checkmark to save the new tag.
Add a canned message
Write a reusable seller reply, assign its tag, and save it.
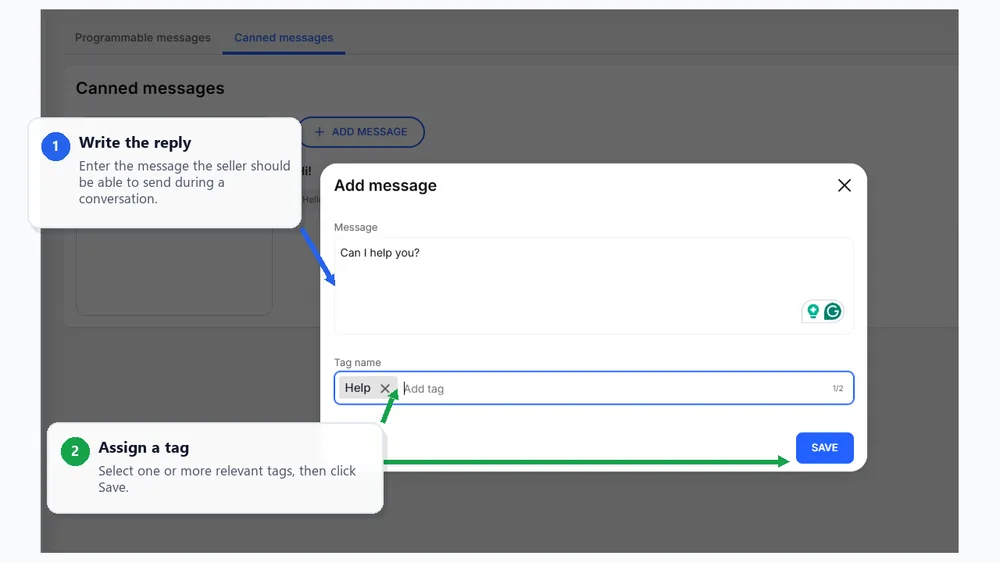
- 1Write the reply
Enter the message the seller should be able to send during a conversation.
- 2Assign a tag
Select one or more relevant tags, then click Save.
Confirm canned messages
Check that the saved message appears under the intended tag.
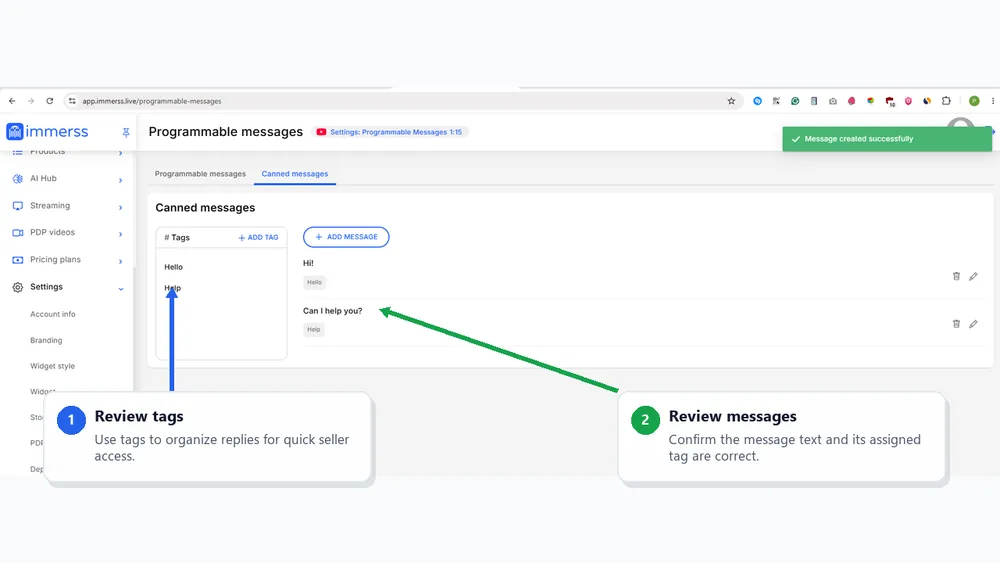
- 1Review tags
Use tags to organize replies for quick seller access.
- 2Review messages
Confirm the message text and its assigned tag are correct.
Plan Programmable Messages
Use different blocks before the seller accepts and after the seller joins the conversation.
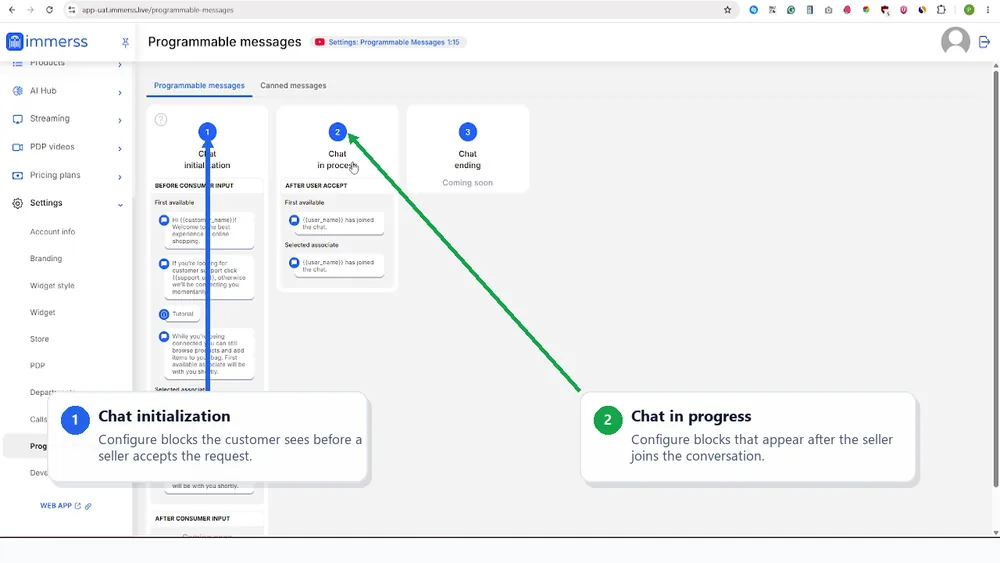
- 1Chat initialization
Configure blocks the customer sees before a seller accepts the request.
- 2Chat in progress
Configure blocks that appear after the seller joins the conversation.
Add programmable blocks
Choose the blocks that fit the customer journey, then save the stage.
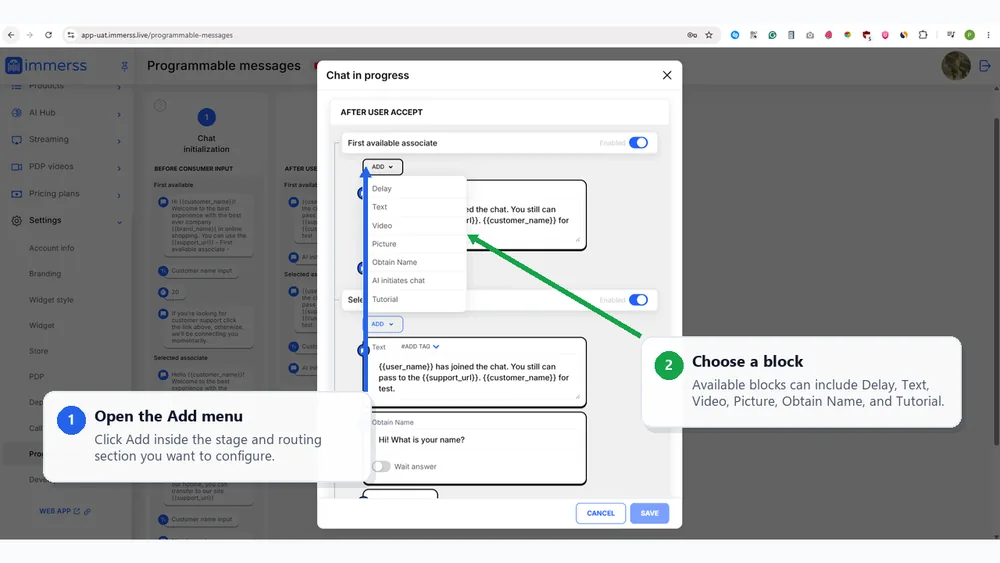
- 1Open the Add menu
Click Add inside the stage and routing section you want to configure.
- 2Choose a block
Available blocks can include Delay, Text, Video, Picture, Obtain Name, and Tutorial.
Option A: Install the iPhone app
The seller can use either the iPhone app or the installed Web App — this step starts Option A. On the seller’s iPhone, find Immerss in the App Store and install the app.
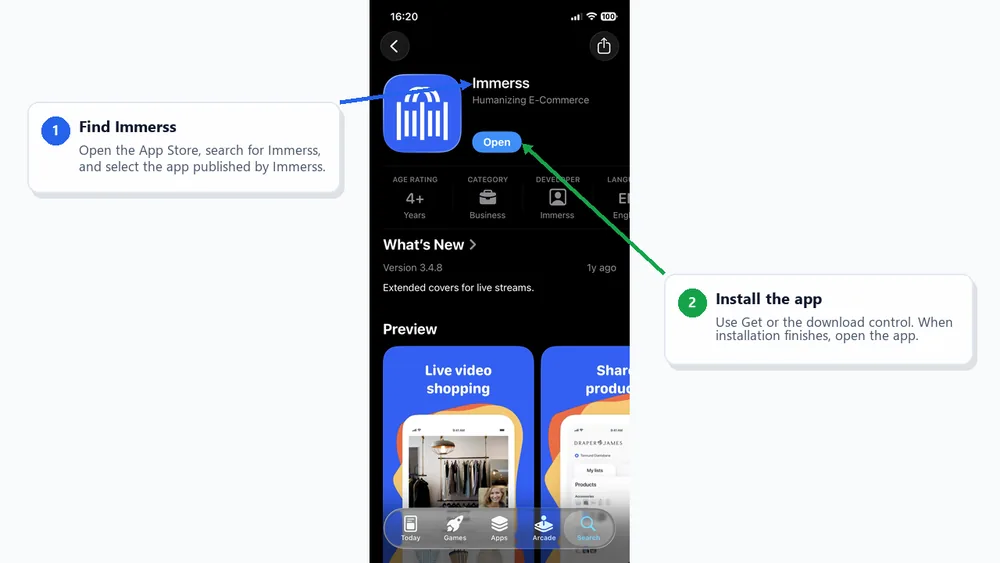
- 1Find Immerss
Open the App Store, search for Immerss, and select the app published by Immerss.
- 2Install the app
Use Get or the download control. When installation finishes, open the app.
Option A: Sign in on iPhone
Use the seller account configured in Immerss User Management.
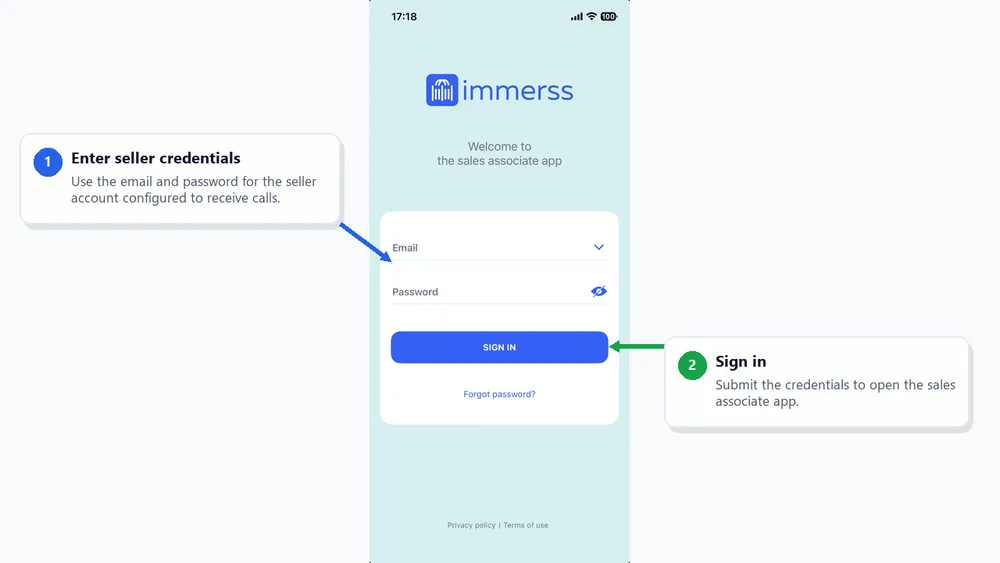
- 1Enter seller credentials
Use the email and password for the seller account configured to receive calls.
- 2Sign in
Submit the credentials to open the sales associate app.
Option A: Set iPhone status to Online
The iPhone app must be online before it can receive the test call.
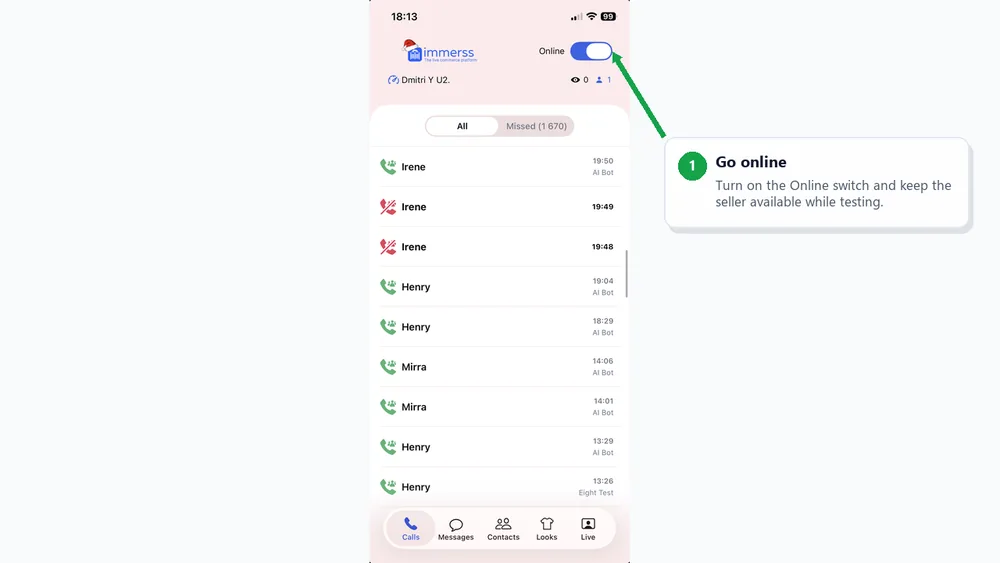
- 1Go online
Turn on the Online switch and keep the seller available while testing.
Option B: Install the Web App
Prefer the desktop instead? Open webapp.immerss.live/auth/sign-in in Chrome and install the app.
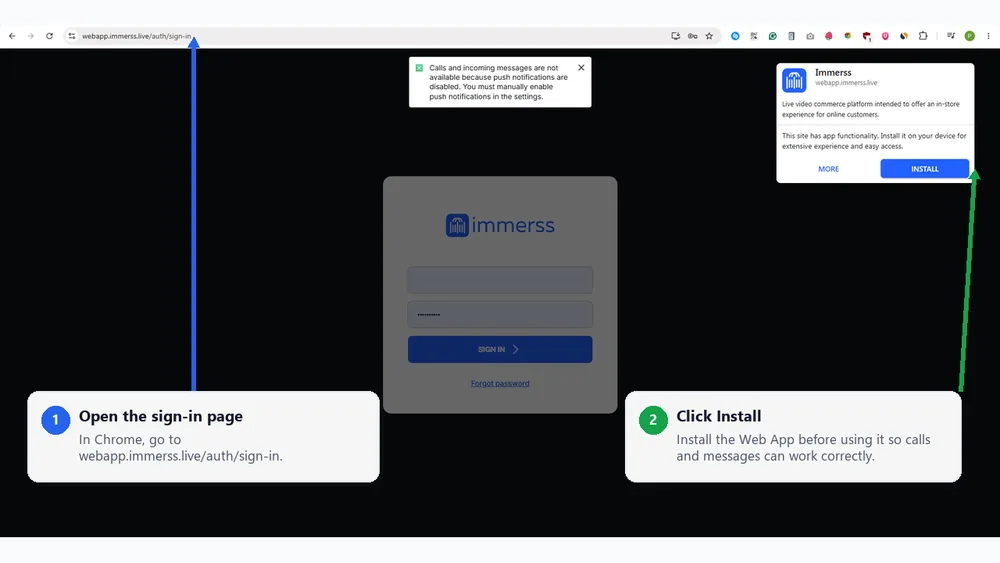
- 1Open the sign-in page
In Chrome, go to webapp.immerss.live/auth/sign-in.
- 2Click Install
Install the Web App before using it so calls and messages can work correctly.
Option B: Confirm installation
Click Install in the browser dialog to open Immerss as an installed Web App.
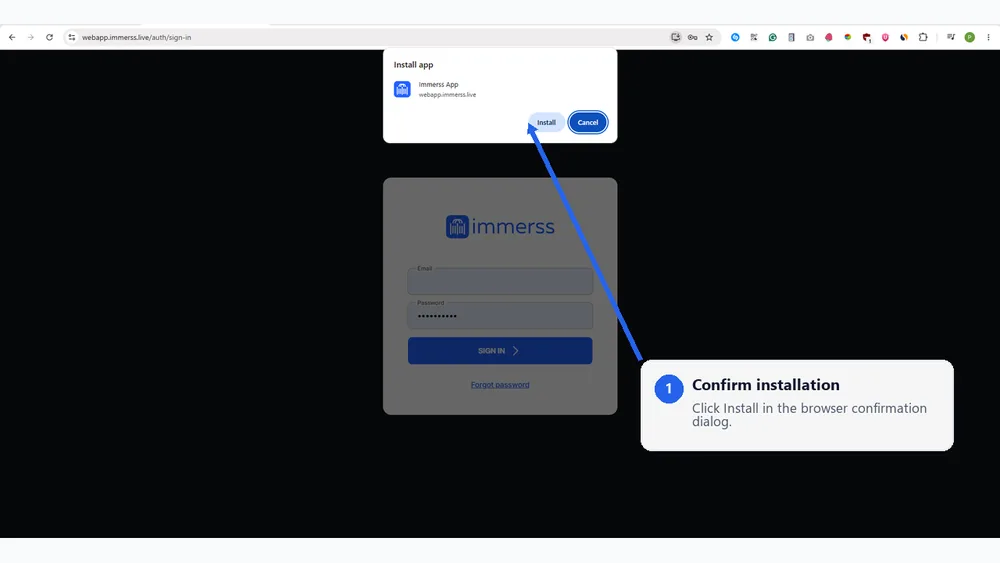
- 1Confirm installation
Click Install in the browser confirmation dialog.
Option B: Sign in to the Web App
Use the seller credentials configured in Immerss User Management.
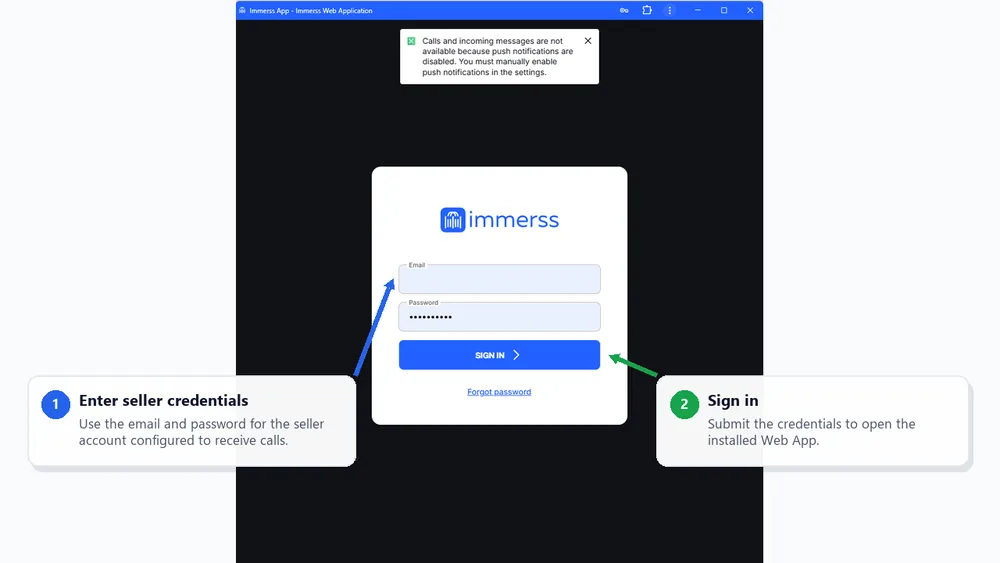
- 1Enter seller credentials
Use the email and password for the seller account configured to receive calls.
- 2Sign in
Submit the credentials to open the installed Web App.
Option B: Go online and allow notifications
The Web App must be Online, with notifications allowed in Windows or macOS.
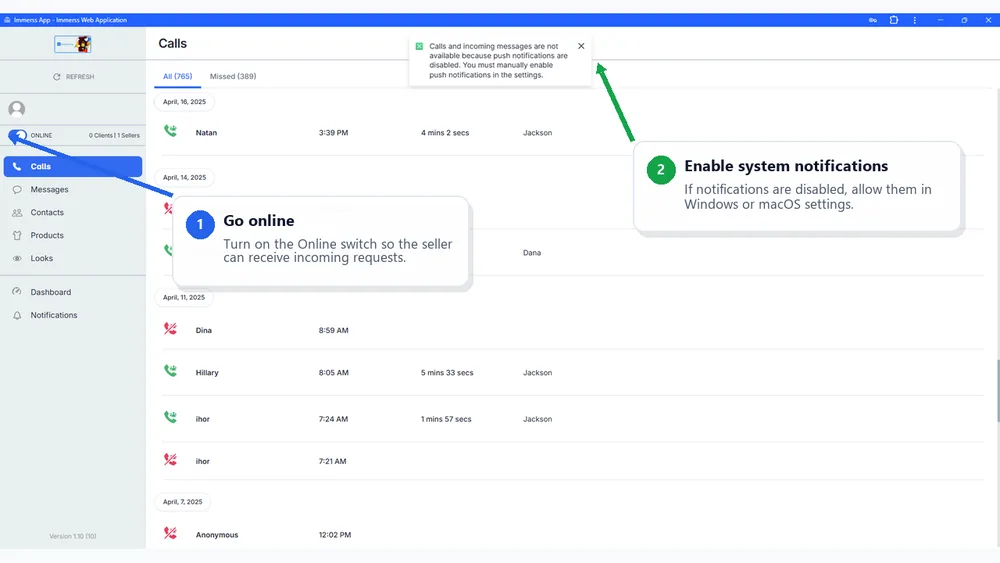
- 1Go online
Turn on the Online switch so the seller can receive incoming requests.
- 2Enable system notifications
If notifications are disabled, allow them in Windows or macOS settings.
Test the call from start to finish
Run one complete shopper-to-seller call using either the iPhone app or the installed Web App.
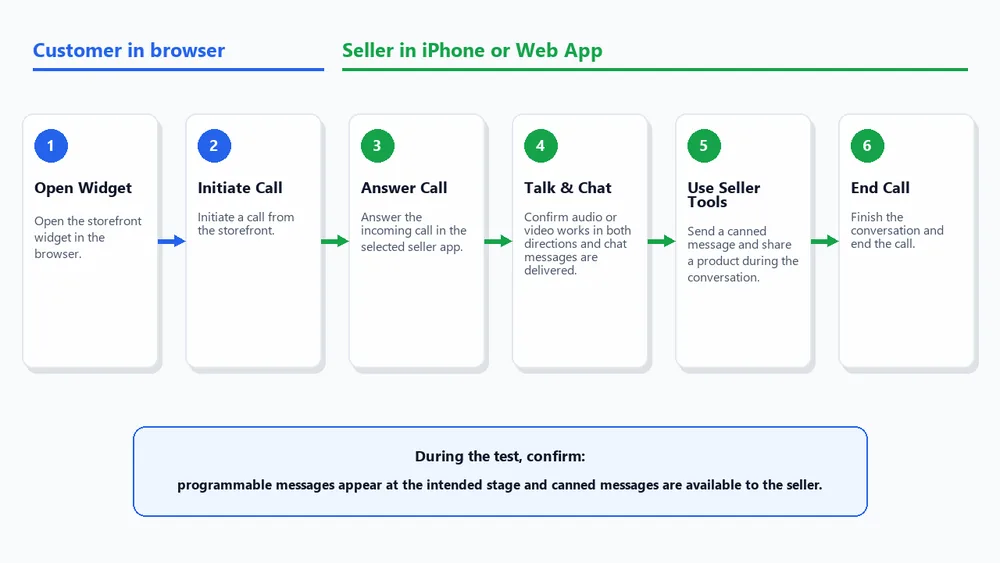
- 1Start from the storefront
Open the widget in the browser and initiate a call.
- 2Answer in the seller app
Take the incoming call in the selected seller app and confirm audio or video works both ways.
- 3Use the seller tools
Send a canned message and share a product during the conversation, then end the call.
- 4Confirm the setup
Check that programmable messages appear at the intended stage and canned messages are available to the seller.
Launch checklist
Use this after setup to confirm the store is ready to go live.
- 1 Shopify app installed for the correct store
- 2 Immerss account connected or created
- 3 Storefront scripts and app embeds activated
- 4 1-1 Virtual Co-Shopping plan selected and Shopify charge approved if required
- 5 Immerss Settings opened and Configure Immerss selected
- 6 Widget branding, style, and visibility configured
- 7 Private number generated for SMS when used; Clienteling enabled for each seller
- 8 Calls & Chat channels and distribution settings reviewed
- 9 Canned-message tags and reusable seller replies created
- 10 Programmable Messages configured for the intended stages
- 11 Immerss seller app installed on iPhone or as the desktop Web App
- 12 Seller signed in with the account configured in User Management
- 13 Seller Online; Windows/macOS notifications enabled for the Web App
- 14 Complete browser-to-seller-app call tested from start to finish