Set up Video Shopping on Shopify
Install the app, brand the player and drop it into your theme, add a host, then run a shoppable live show on your storefront — and publish the recording afterwards.
Want a 24/7 AI agent or live 1-1 selling instead? See all setup guides →
Before you start Setup ~30 min · plus your first show
- Admin access to your Shopify store
- Access to edit the store theme for the embed code
- Your brand logo and colors handy
- An iPhone for the host, and the products to feature
Find the Shopify app
In the Shopify App Store, search for Immersive Shopping & Videos.
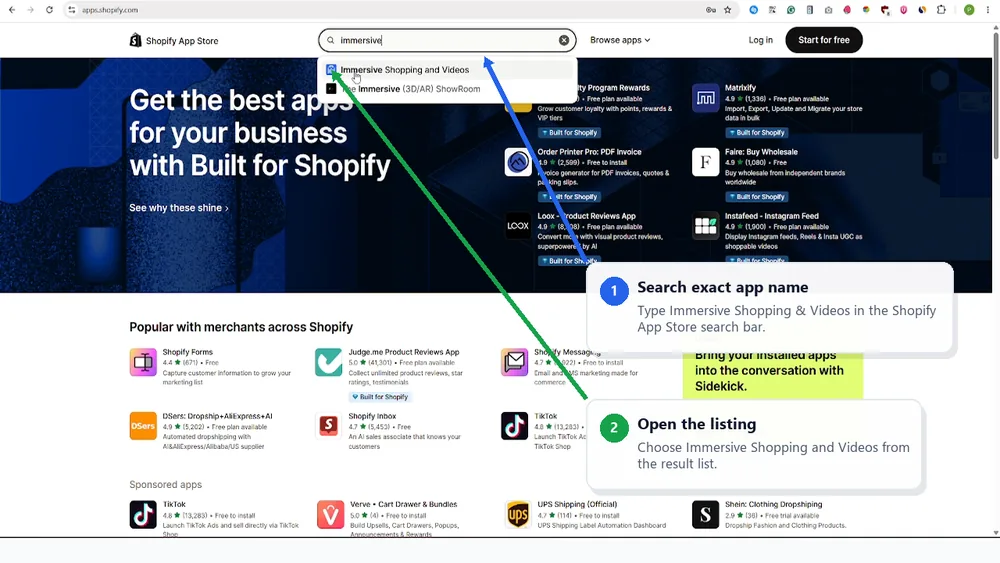
- 1Search the exact name
Type “Immersive Shopping & Videos” in the App Store search bar.
- 2Open the listing
Choose Immersive Shopping and Videos from the results.
Start installation
Click Install and log in with the store account.
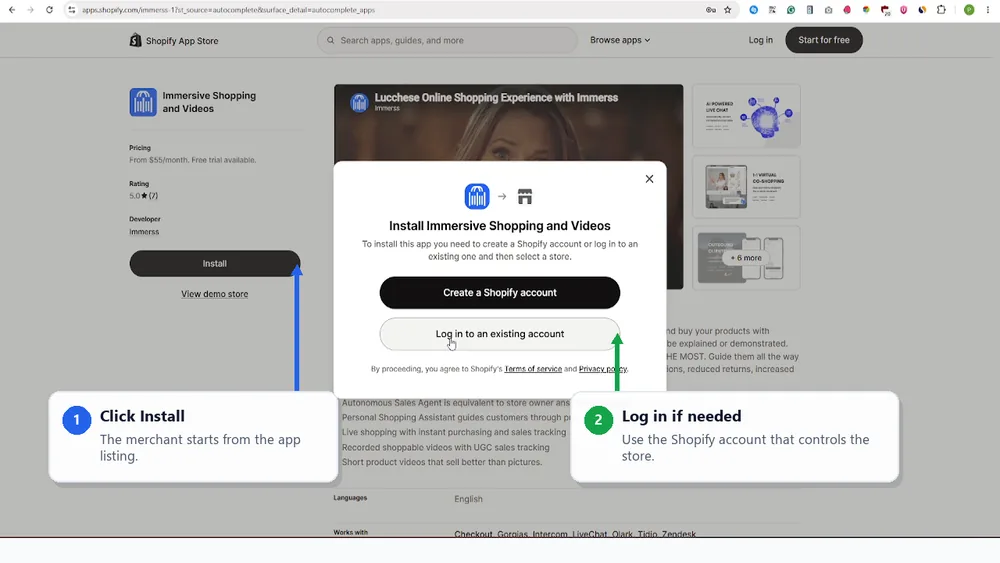
- 1Click Install
The installation starts from the app listing.
- 2Log in if needed
Use the Shopify account that controls the store.
Approve permissions
Review the access scopes and authorize the app.
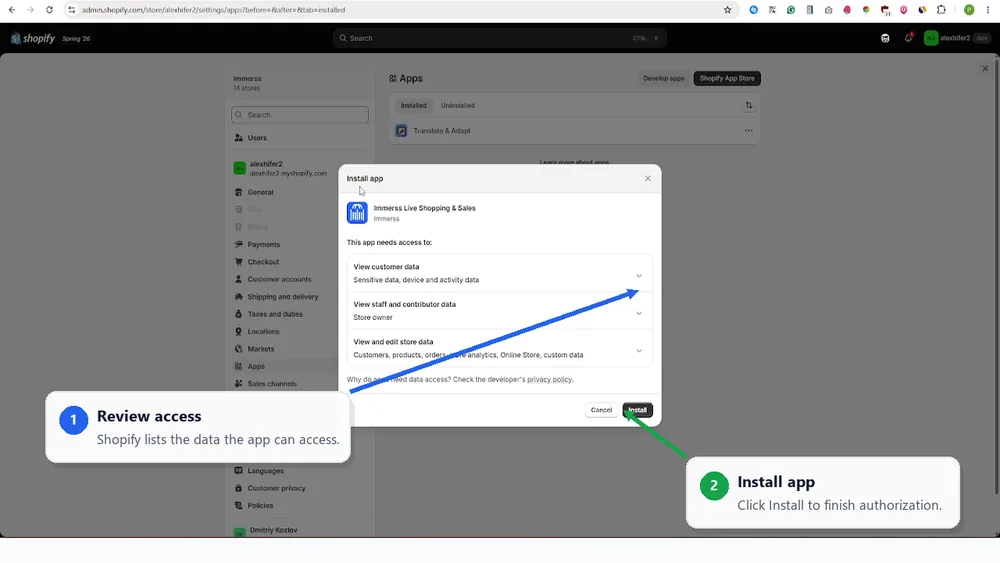
- 1Review access
Shopify lists the data the app can access.
- 2Install app
Click Install to finish authorization.
Connect your Immerss account
Sign in on the left, or register a new Immerss account on the right.
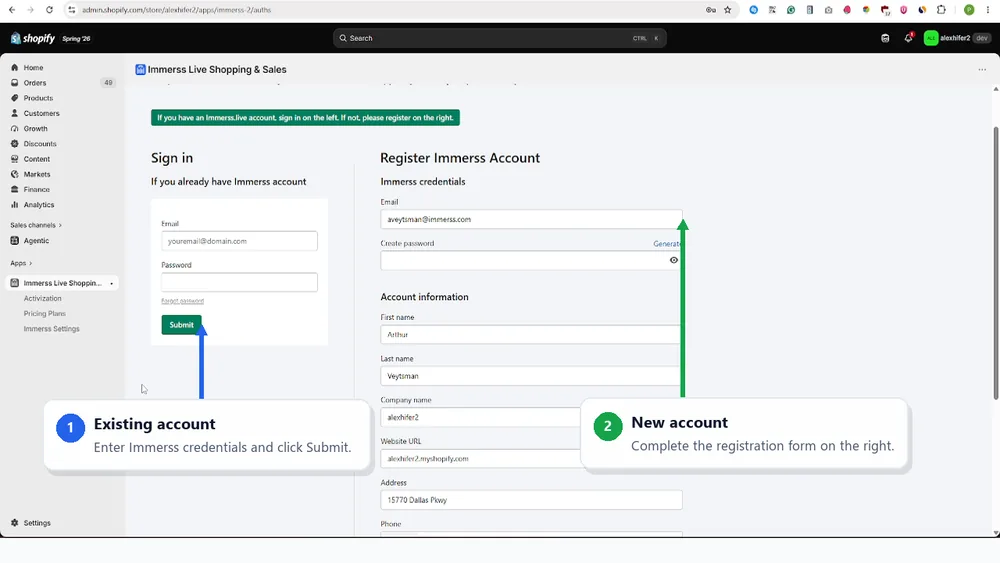
- 1Existing account
Enter Immerss credentials and click Submit.
- 2New account
Complete the registration form on the right.
Activate scripts
In the Shopify app Activation, click Activate for each required storefront script.
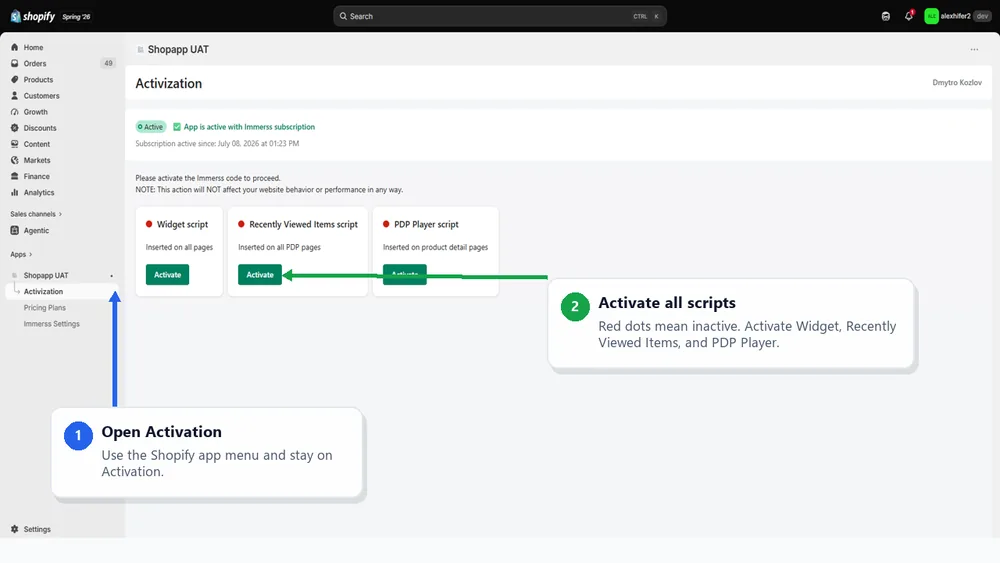
- 1Open Activation
Use the Shopify app menu and go to Activation.
- 2Activate all scripts
Turn on Widget, Recently Viewed Items, and PDP Player — red dots mean inactive.
Enable app embeds
Shopify opens the theme editor for the embedded blocks.
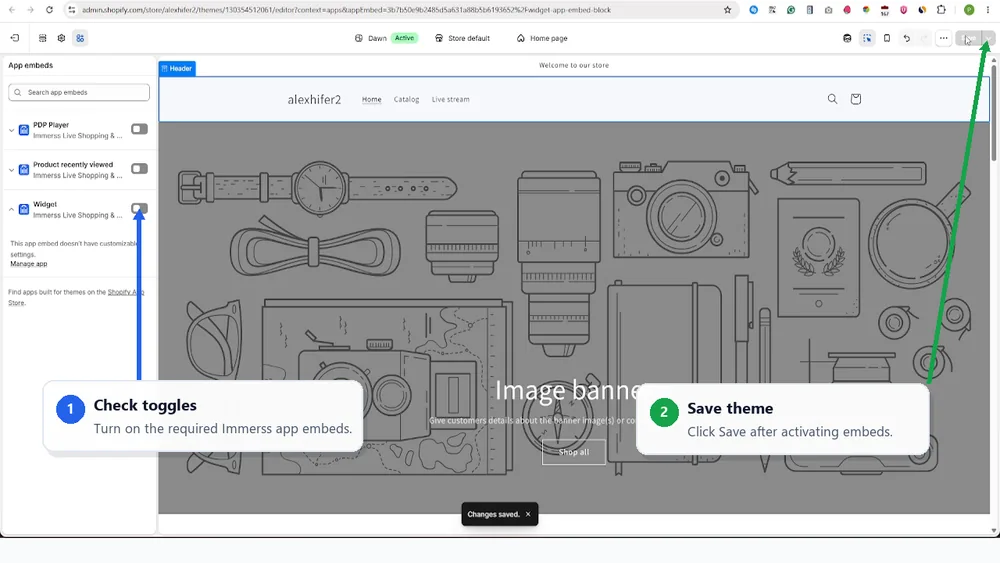
- 1Check the toggle
Turn on the required Immerss app embed.
- 2Save the theme
Click Save after activating the embeds.
Open Pricing Plans
In the Shopify app, open Pricing Plans and click Select Plan.
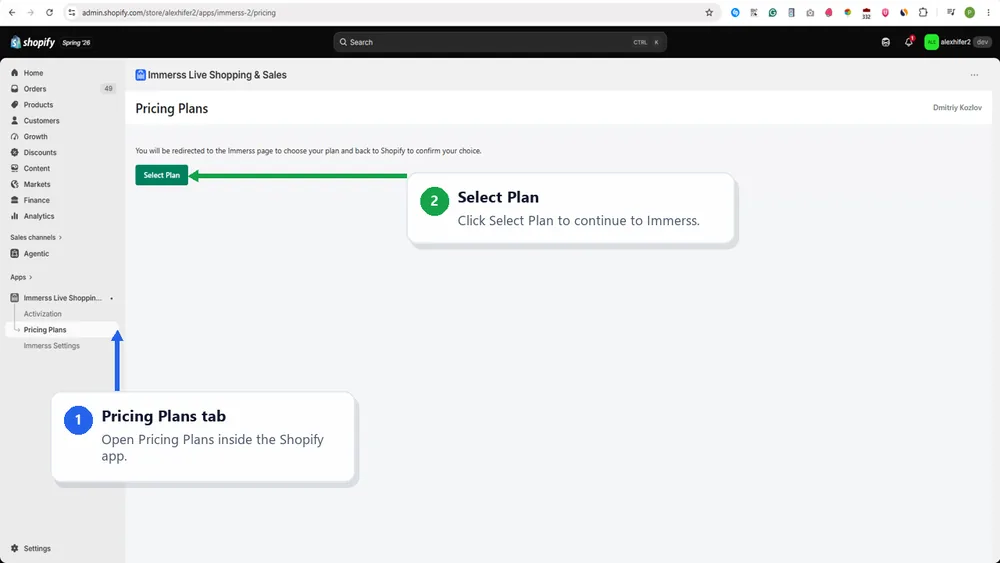
- 1Pricing Plans tab
Open Pricing Plans inside the Shopify app.
- 2Select Plan
Click Select Plan to continue to Immerss.
Choose Video Shopping
Set the store traffic tier, select Video Shopping, and proceed.
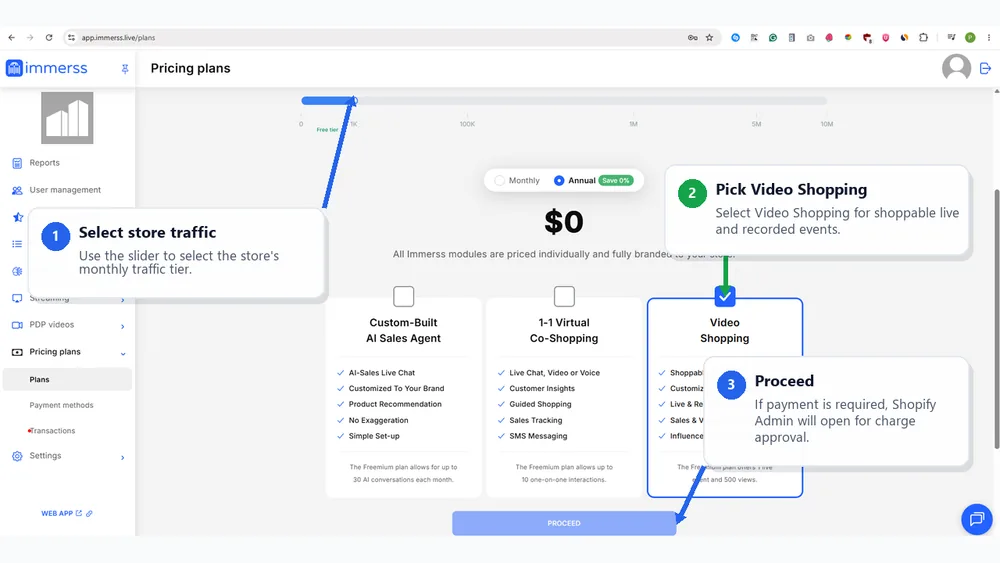
- 1Select store traffic
Use the slider to select the store’s monthly traffic tier.
- 2Pick Video Shopping
Select Video Shopping for shoppable live and recorded events.
- 3Proceed
If payment is required, Shopify Admin will open for charge approval.
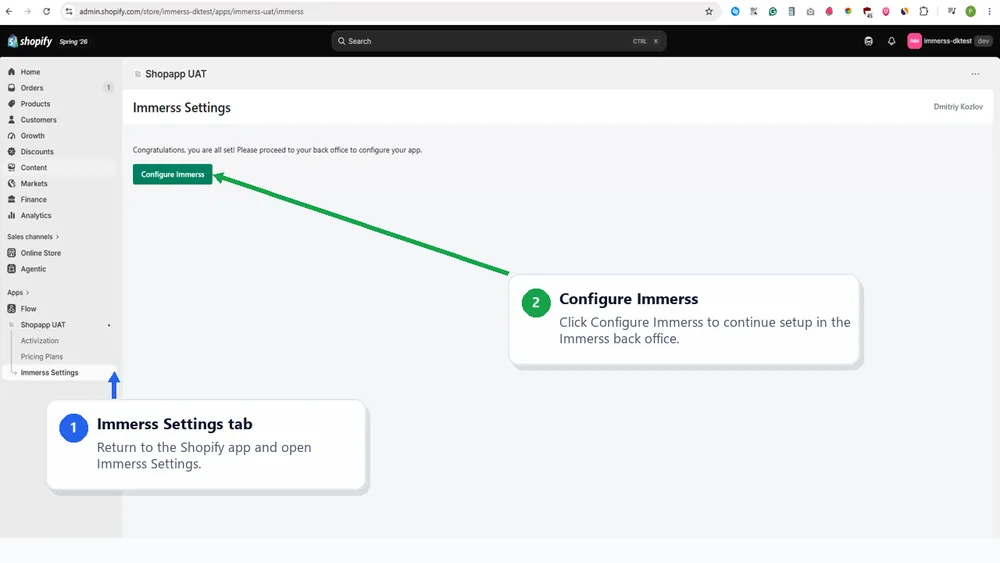
Open Immerss Settings
After approving a paid plan in Shopify Admin, open Immerss Settings and click Configure Immerss.
- 1Immerss Settings tab
Return to the Shopify app and open Immerss Settings.
- 2Configure Immerss
Click Configure Immerss to continue setup in the Immerss back office.
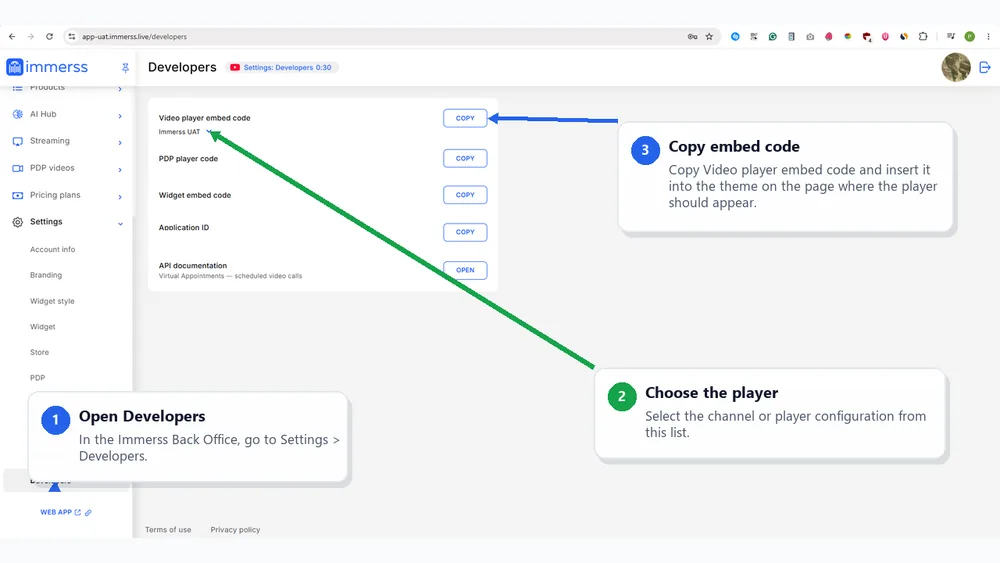
Copy the video player embed code
Open Settings > Developers, copy the Video player embed code, and insert it into your store theme.
- 1Open Developers
In the Immerss Back Office, go to Settings > Developers.
- 2Choose the player
Select the channel or player configuration from this list.
- 3Copy embed code
Copy Video player embed code and insert it into the theme on the page where the player should appear.
Set the company logo and brand colors
Open Settings > Branding, upload the company logo, and choose the player colors.
- 1Upload company logo
Use Choose to upload the logo shown across Immerss interfaces.
- 2Choose brand colors
Set the brand, background, font, and additional-element colors.
Configure the video player
In Settings > Branding > Video player, choose the font, set the maximum width, and review the player background.
- 1Choose the font
Select the font used by the embedded Video Shopping player.
- 2Set player width
Enter the maximum player width in pixels and review the background and layout in the preview.
Add a host user
Go to User Management > Add User, enter the new user’s details, and configure Streaming access.
- 1Enter user details
Add the host’s name, email, role, and other required account details.
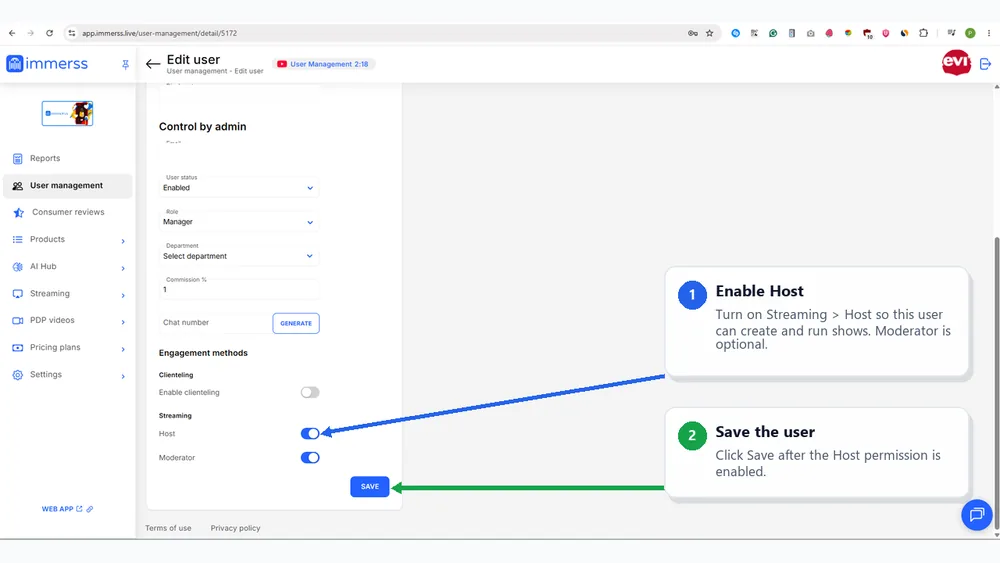
- 2Enable Host
Turn on Streaming > Host. This permission is required to create and run shows.
- 3Optional Moderator
Turn on Moderator only when this user should also moderate streams, then save the user.
Optional: Assign a moderator
Enable Streaming > Moderator for a teammate who will support the host during the live event.
- 1Enable Moderator
Turn on Streaming > Moderator for the teammate who will support the host, then save the user.
- 2Moderator duties
A moderator can monitor chat, answer shoppers, remove abusive messages, and pin featured products.
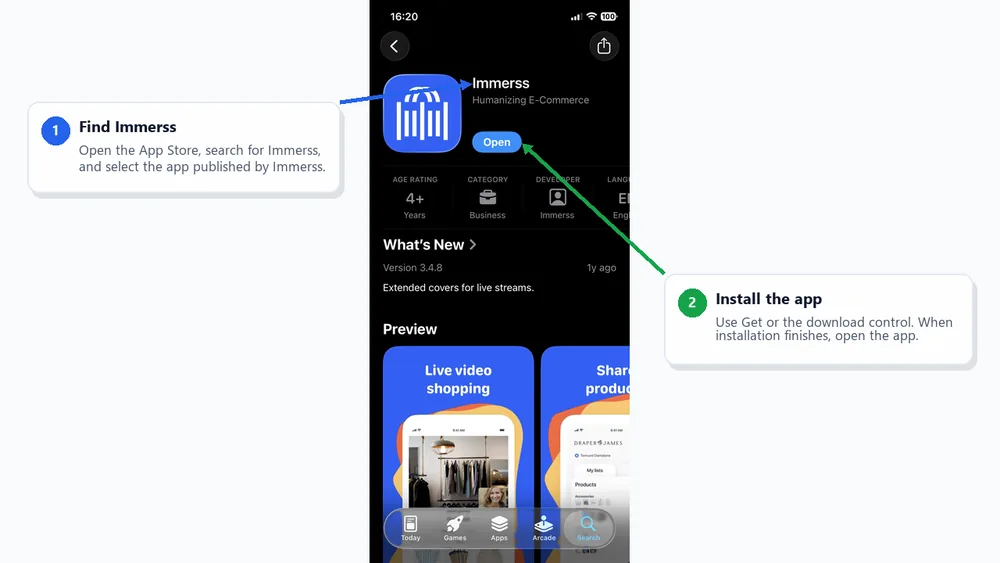
Install the Immerss iPhone app
On the host’s iPhone, find Immerss in the App Store and install the app.
- 1Find Immerss
Open the App Store, search for Immerss, and select the app published by Immerss.
- 2Install the app
Use Get or the download control. When installation finishes, open the app.
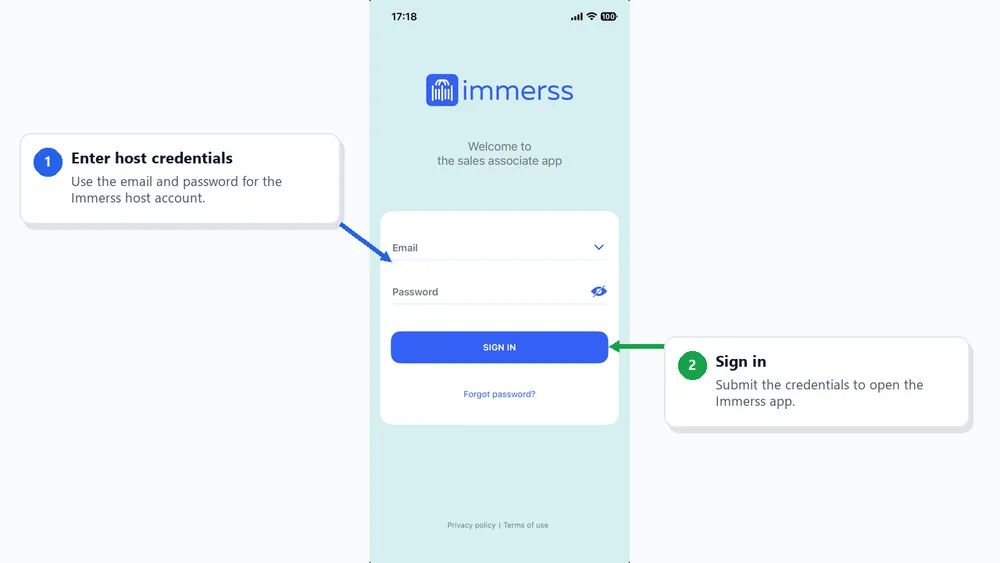
Sign in to the host app
Use the Immerss account assigned as the show host.
- 1Enter host credentials
Use the email and password for the Immerss host account.
- 2Sign in
Submit the credentials to open the Immerss app.
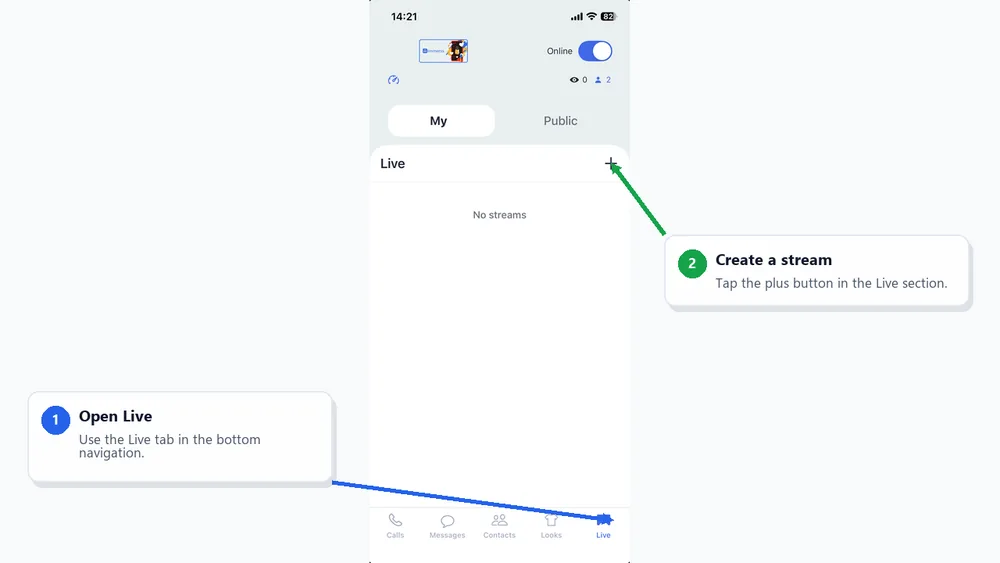
Option A: Start a stream on iPhone
A show can be created on the iPhone or in the Back Office — this step starts Option A. Open the Live tab and tap the plus button.
- 1Open Live
Use the Live tab in the bottom navigation.
- 2Create a stream
Tap the plus button in the Live section.
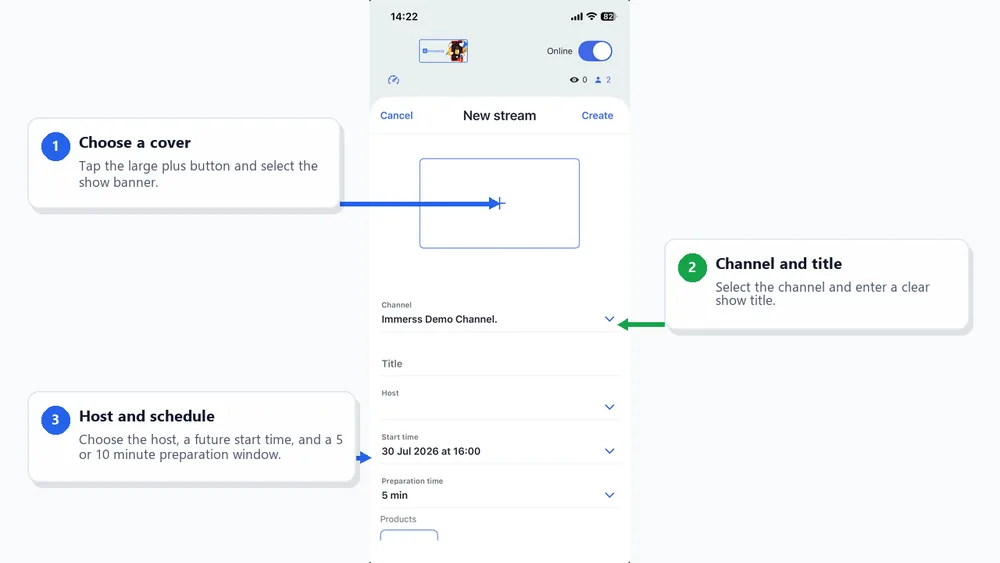
Option A: Add the show details
Choose a cover, channel, title, host, start time, and preparation time.
- 1Choose a cover
Tap the large plus button and select the show banner.
- 2Channel and title
Select the channel and enter a clear show title.
- 3Host and schedule
Choose the host, a future start time, and a 5 or 10 minute preparation window.
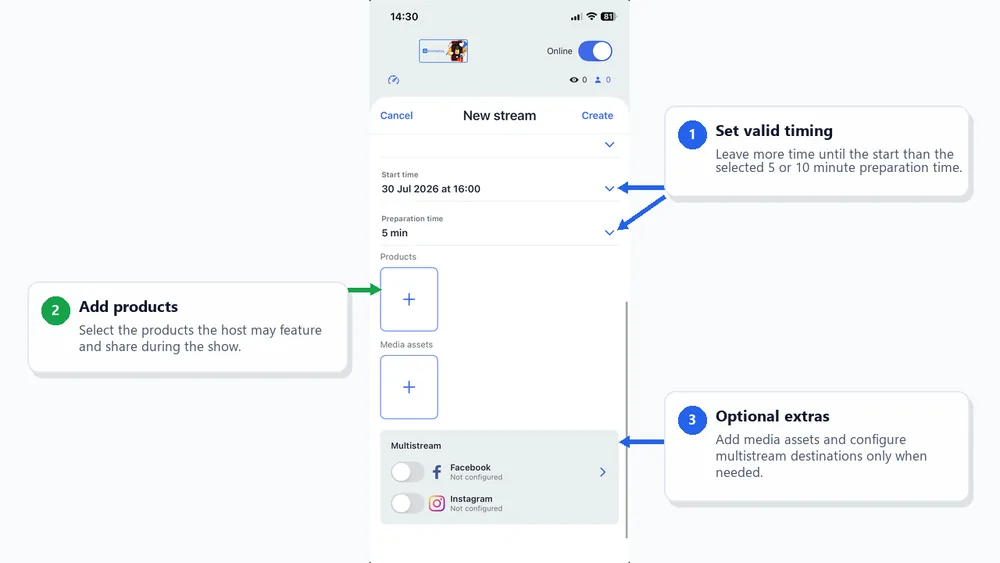
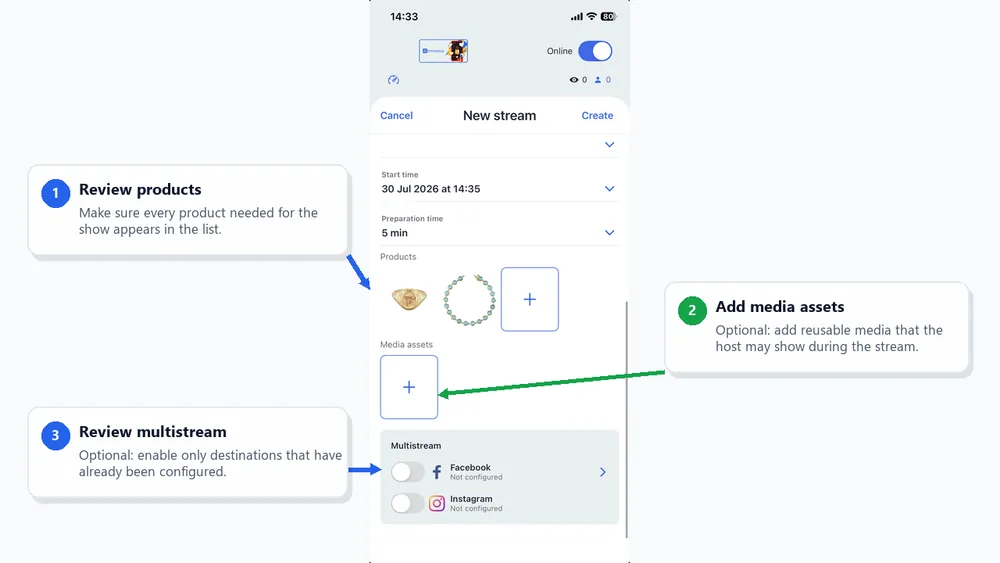
Option A: Review products and distribution
Confirm the selected products, optional media, and any multistream destinations.
- 1Select products
Select the products you want to present. Drag and drop to set the sequence of appearance.
- 2Add media assets
Optional: add pictures/videos to show during the stream.
- 3Set up multistream
Optional: stream to your social sites in parallel.
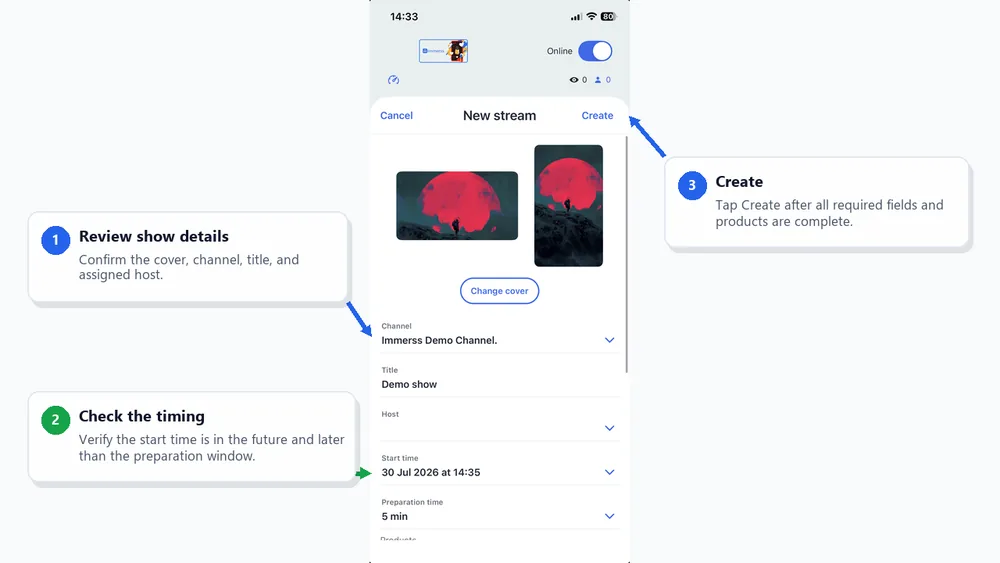
Option A: Create the show
Review the completed setup, then tap Create.
- 1Review show details
Confirm the cover, channel, title, and assigned host.
- 2Check the timing
Verify the start time is in the future and later than the preparation window.
- 3Create
Tap Create after all required fields and products are complete.
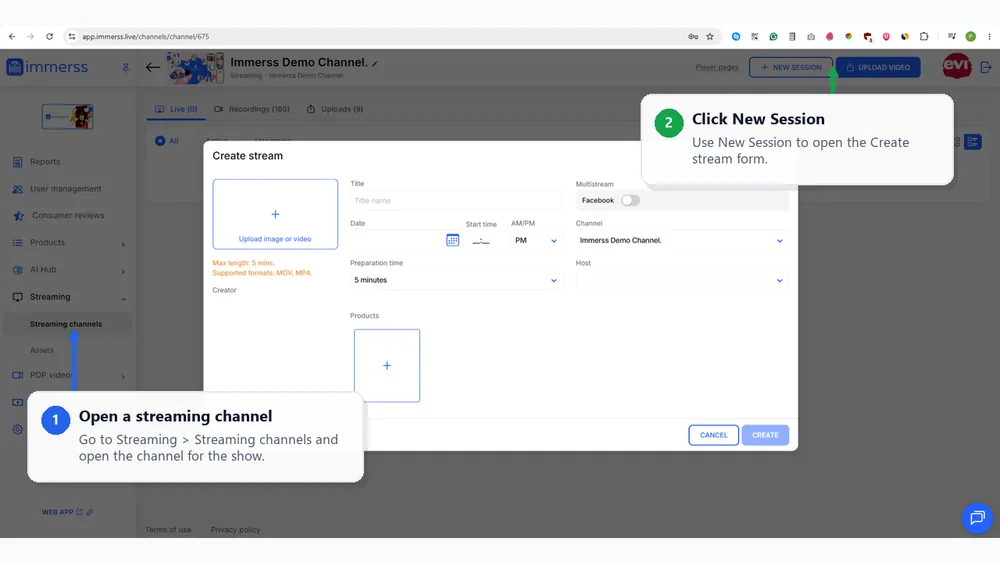
Option B: Create a session from the back office
Prefer the desktop? Go to Streaming > Streaming channels, open a channel, and click New Session.
- 1Select a streaming channel
Go to Streaming > Streaming channels and open the channel for the show.
- 2Click New Session
Use New Session to open the Create stream form.
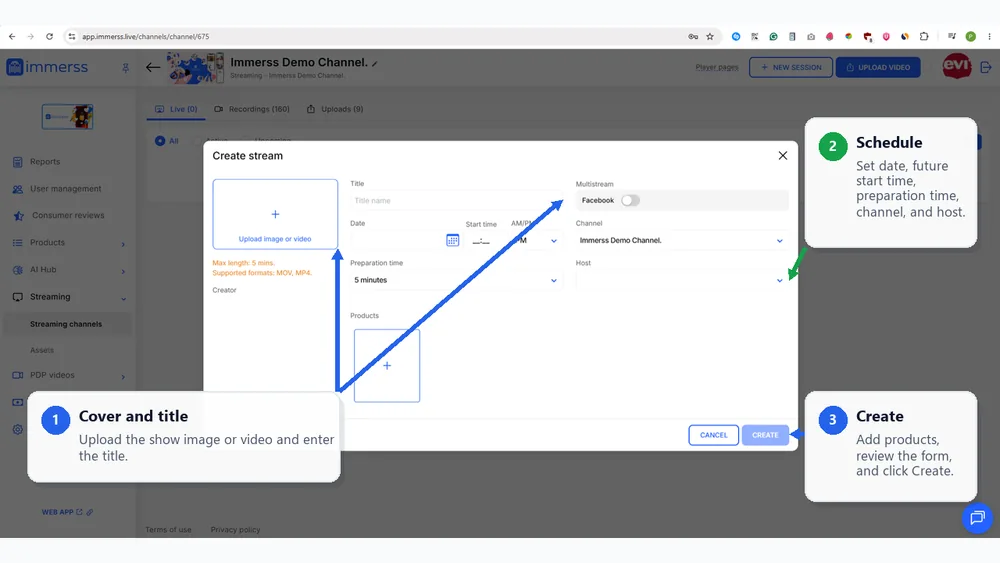
Option B: Complete the session form
The Back Office form uses the same show details, timing, host, products, and optional multistream settings.
- 1Cover and title
Upload the show image or video and enter the title.
- 2Schedule
Set date, future start time, preparation time, channel, and host.
- 3Create
Add products, review the form, and click Create.
Preview the scheduled event
Your event will automatically be visible on your site’s embedded player once it’s created.
- 1Open the storefront page
Go to the page where you inserted the embed code.
- 2Check the countdown
The scheduled show appears with its cover, start time, and a Remind me control for shoppers.
- 3Confirm the details
Verify the show title, host, and cover are the ones you set.
Promote the scheduled event
After the session is created and the player is embedded, share the storefront link with shoppers.
- 1Copy the event link
Use the Share control on the storefront player and copy the event link.
- 2Share on social channels
Use the available channel icons when they match the store’s promotion plan.
- 3Promote beyond social
Also share the event through email, the store homepage, and other customer channels.
Prepare the iPhone before the show
Before entering preparation time, enable Focus or Do Not Disturb and turn off Portrait Orientation Lock.
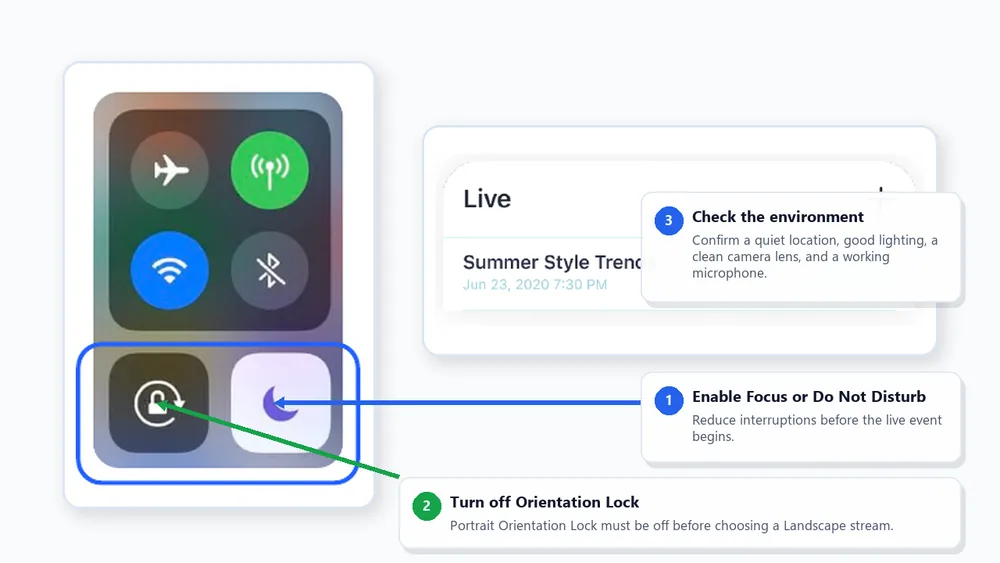
- 1Enable Focus or Do Not Disturb
Reduce interruptions before the live event begins.
- 2Turn off Orientation Lock
Portrait Orientation Lock must be off before choosing a Landscape stream.
- 3Check the environment
Confirm a quiet location, good lighting, a clean camera lens, and a working microphone.
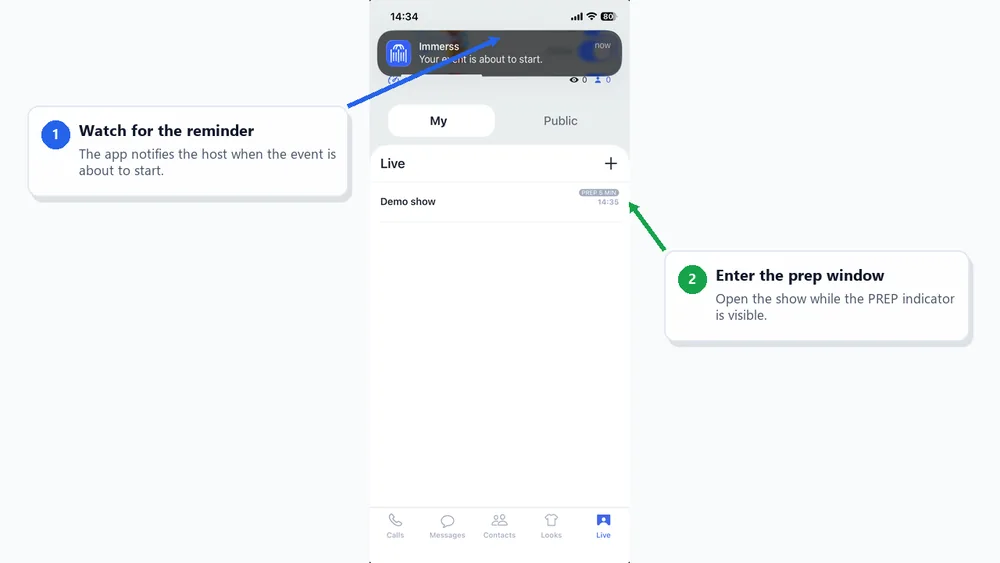
Join during preparation time
Open the show during its preparation window to check the setup before going live.
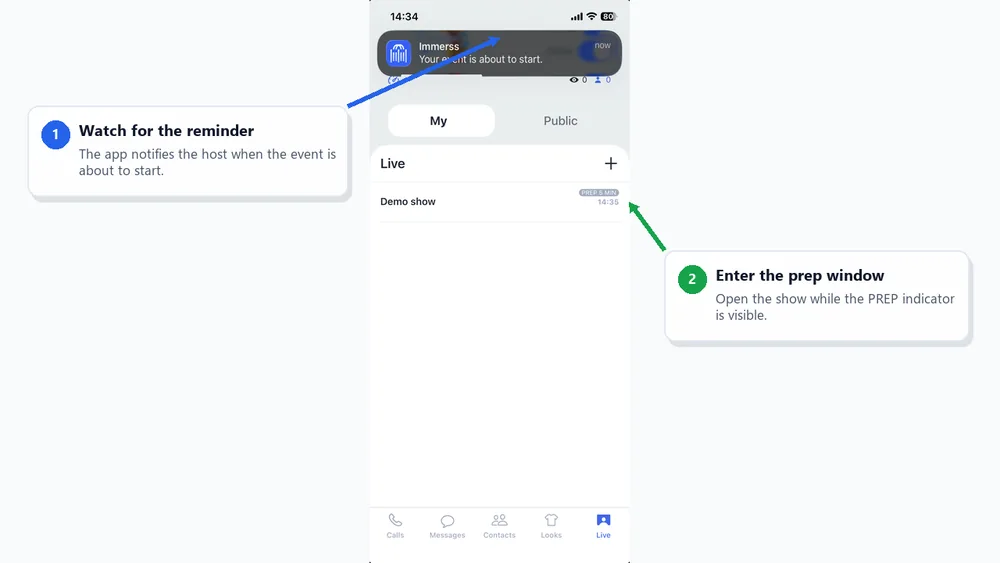
- 1Watch for the reminder
The app notifies the host when the event is about to start.
- 2Enter the prep window
Open the show while the PREP indicator is visible.
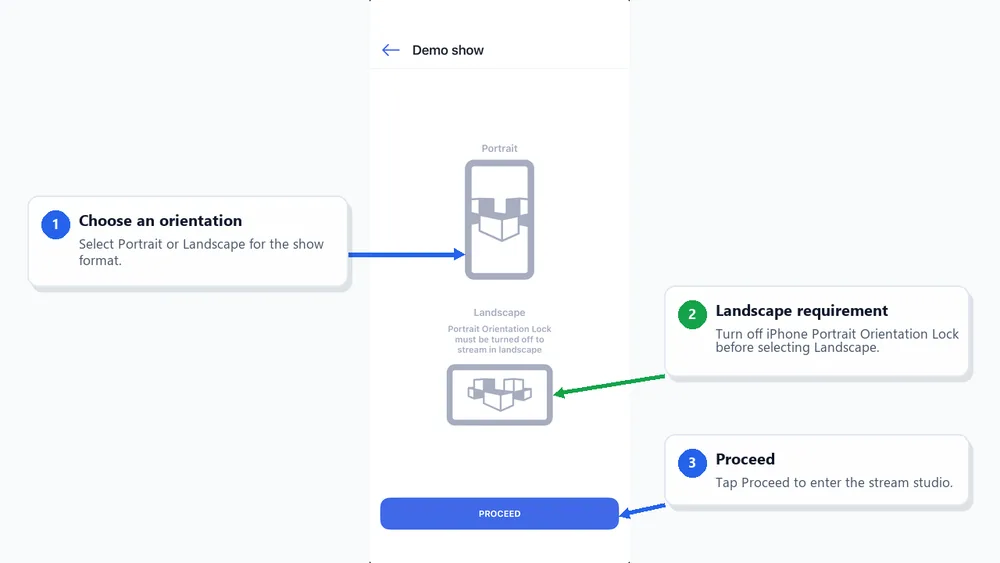
Choose the stream orientation
Select Portrait or Landscape, then tap Proceed.
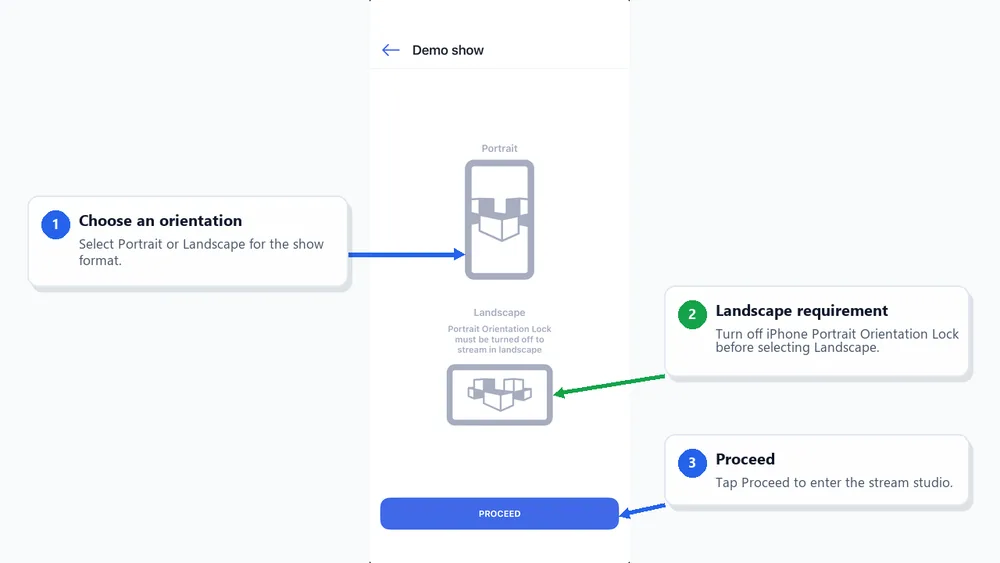
- 1Choose an orientation
Select Portrait or Landscape for the show format.
- 2Landscape requirement
Turn off iPhone Portrait Orientation Lock before selecting Landscape.
- 3Proceed
Tap Proceed to enter the stream studio.
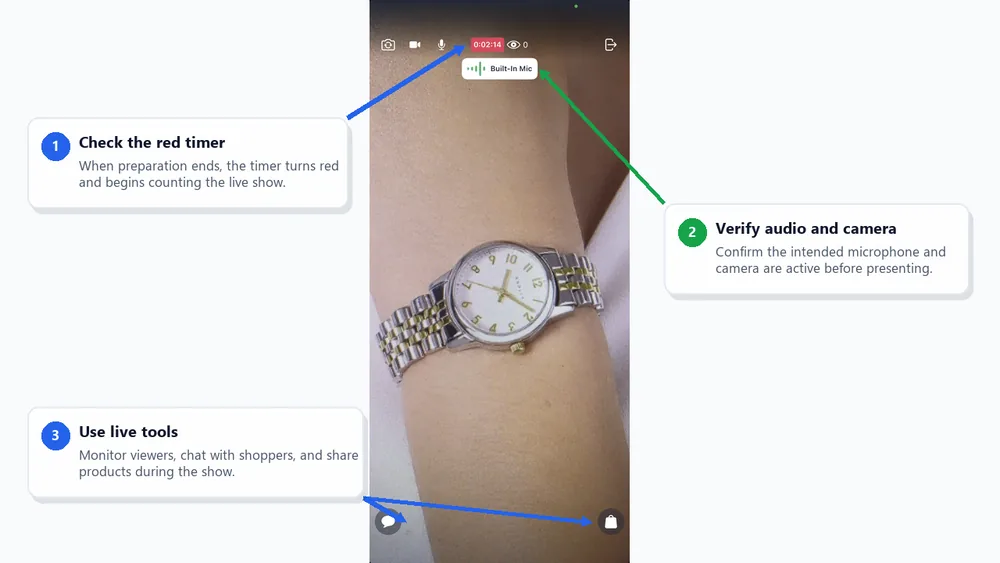
Present the live event
When the timer turns red, present the show, monitor chat, and share products.
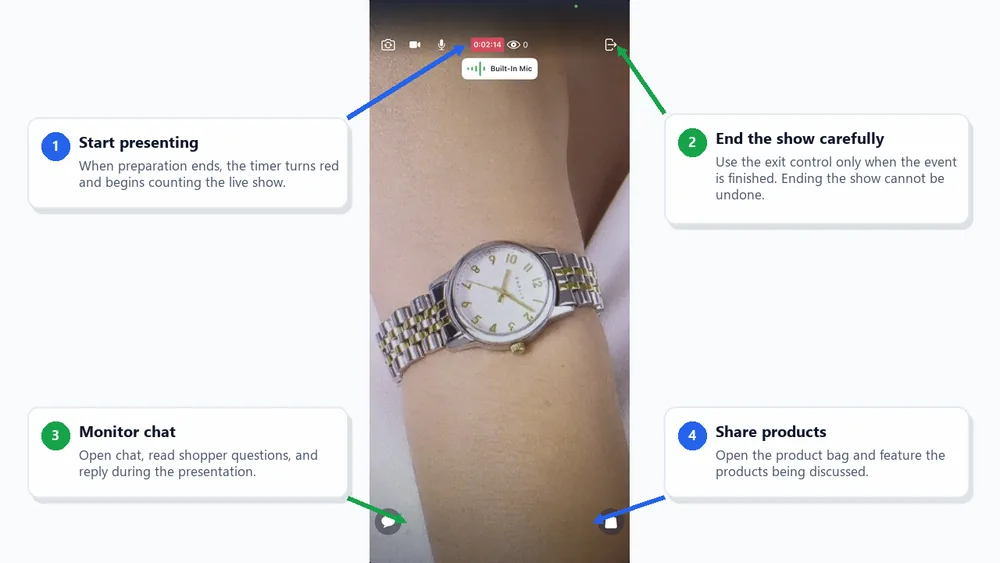
- 1Start presenting
When preparation ends, the timer turns red and begins counting the live show.
- 2End the show carefully
Use the exit control only when the event is finished. Ending the show cannot be undone.
- 3Monitor chat
Open chat, read shopper questions, and reply during the presentation.
- 4Share products
Open the product bag and feature the products being discussed.
Optional: Use playlist and media assets
During the show, open the playlist and share prepared images or videos when needed.
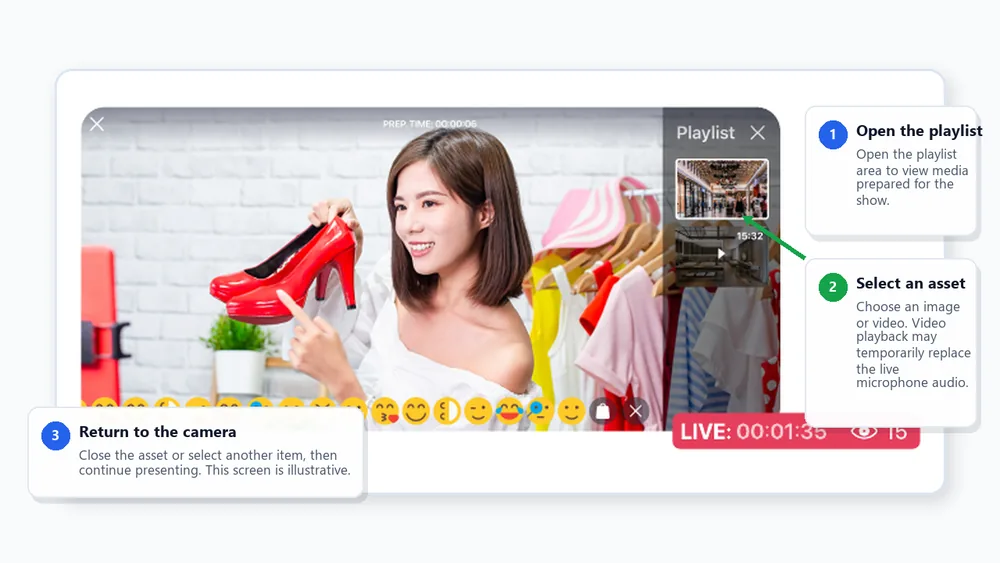
- 1Open the playlist
Open the playlist area to view media prepared for the show.
- 2Select an asset
Choose an image or video. Video playback may temporarily replace the live microphone audio.
- 3Return to the camera
Close the asset or select another item, then continue presenting.
Edit and publish the recording
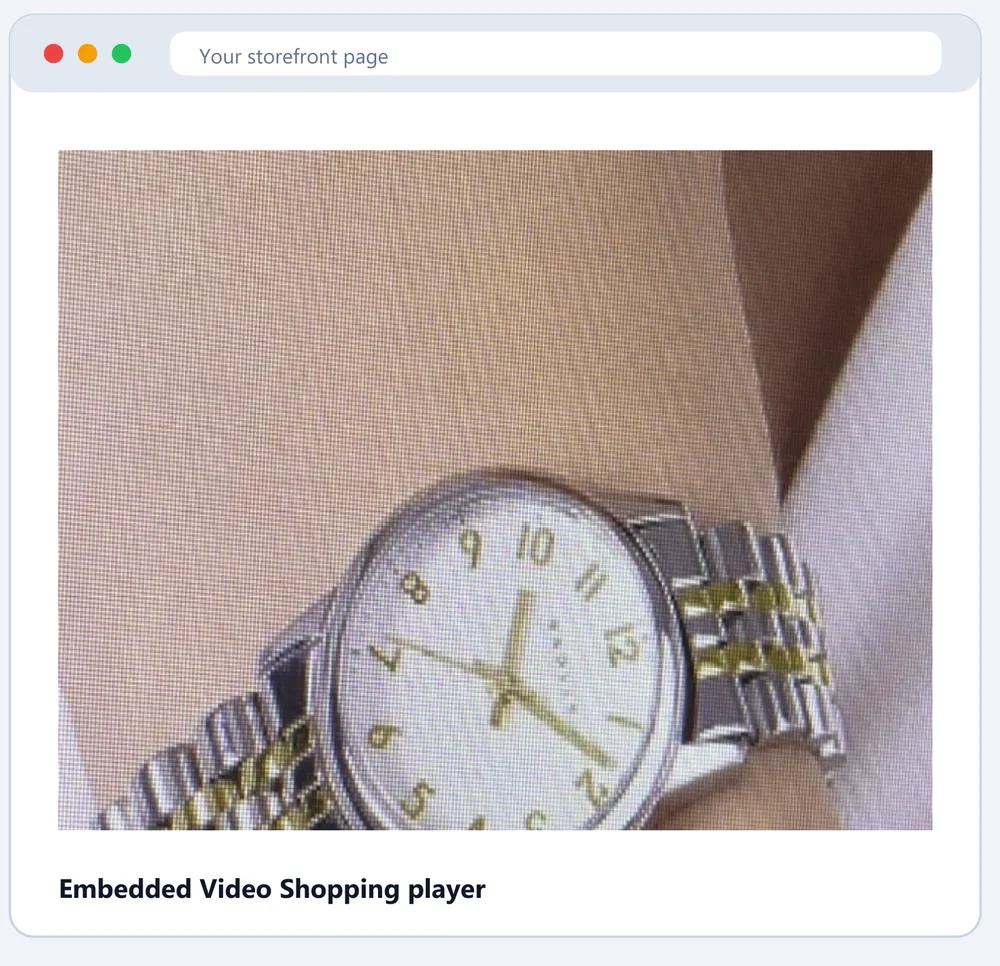
After the event, open the ready notification, review the recording, process it, and publish it to the player.
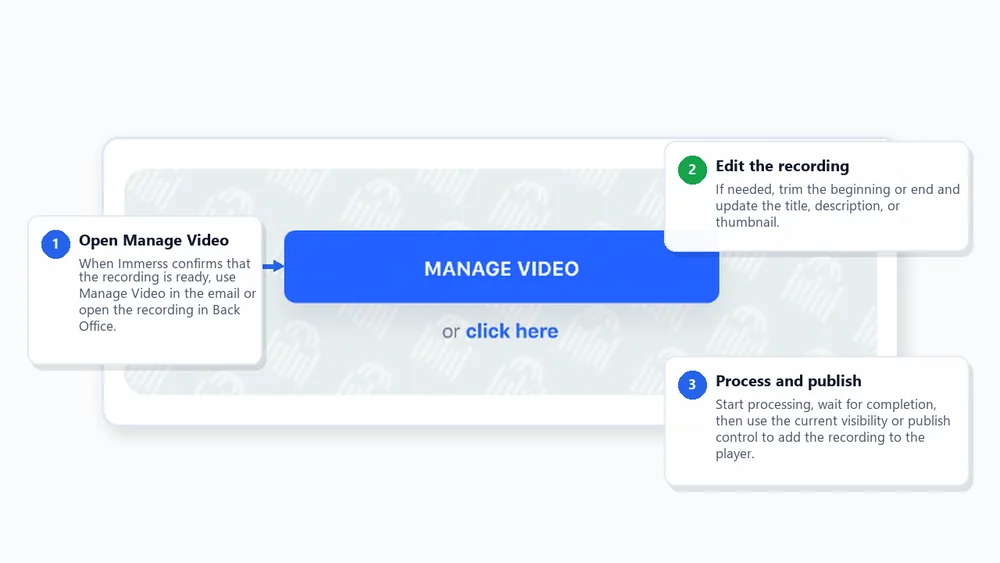
- 1Open Manage Video
When Immerss confirms that the recording is ready, use Manage Video in the email or open the recording in Back Office.
- 2Edit the recording
If needed, trim the beginning or end and update the title, description, or thumbnail.
- 3Process and publish
Start processing, wait for completion, then use the current visibility or publish control to add the recording to the player.
Launch checklist
Use this after setup to confirm the store is ready to go live.
- 1 Shopify app installed for the correct store
- 2 Immerss account connected or created
- 3 Storefront scripts and app embeds activated
- 4 Video Shopping plan selected and Shopify charge approved if required
- 5 Immerss Settings opened and Configure Immerss selected
- 6 Video player embed code inserted into the intended store theme or page
- 7 Company logo and brand colors configured
- 8 Video player font, maximum width, and background appearance reviewed
- 9 Separate host user created and Streaming > Host enabled
- 10 Moderator access enabled only when another teammate will moderate
- 11 Immerss iPhone app installed and host signed in
- 12 Show created from iPhone or the Immerss Back Office
- 13 Cover, channel, title, and host reviewed
- 14 Start time and preparation window reviewed
- 15 Products, media assets, and optional multistream settings reviewed
- 16 Scheduled event visible in the embedded storefront player
- 17 Storefront share link tested and the scheduled event promoted
- 18 Focus or Do Not Disturb on; Portrait Orientation Lock off
- 19 Host joins during preparation time; lighting, camera, and microphone checked
- 20 Live tools tested: chat, products, and optional playlist assets
- 21 Recording edited and processed after the event
- 22 Recording published to the embedded storefront player